Message Database
Create, view, and edit messages to use with a Message Display Text Object. Messages can contain any alphanumeric information.
Each message is assigned a Message No., which triggers the message in a Message Display Text Object. You can format message text to a variety of colors and sizes.
Go to Database menu from the Main menu to add, edit, or delete messages as needed.
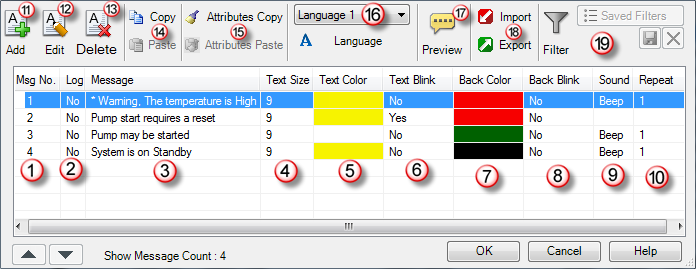
 This list details information in the numbered image
-
Msg. No.: shows the specific message number. This number is automatic but you can modify it when you add or edit the message.
-
Log: indicates when you configure messages to log. Configure log message when you add or edit messages. See Add a New Message for more information.
-
Message: the message text
-
Text Size: message text size
-
Text Blink: yes in this column indicates that text on the message blinks
-
Back Blink: yes in this column indicates that the message background blinks
-
Sound: shows if a sound plays when the message displays
-
A blank field indicates no sound
-
Beep in this field means that when the message appears, a beep sounds.
-
A file name appears for WAV sounds you assign
-
Repeat: how many times a sound repeats when the message displays
-
The word Loop in this field indicates the sound plays continuously as long as the Message displays
-
Add: add a new message
-
Edit: edit the message
-
To learn more, see Edit a Message
-
Delete: permanently deletes the message
-
Copy: copy a message
Paste to duplicate the address in the list -
Attributes Copy / Attributes Paste: copy the message attributes
Click Paste to duplicate the address in the list -
Preview: see a preview of the message.
-
Import / Export: import an existing message database from .XLS format or save the message database as an .XLS file for export
-
Filter: filter the list to make it easy to find a message for databases with large amounts of information
Add a New Message
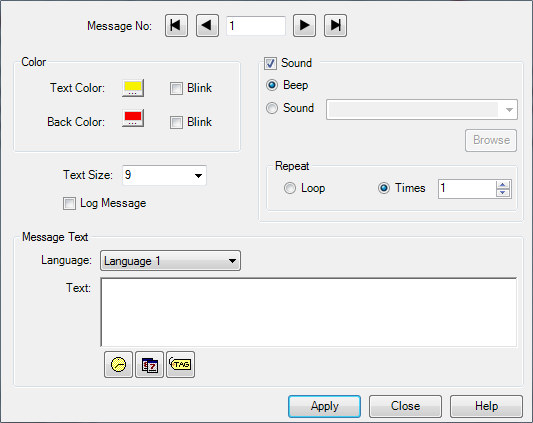
Click the Add button labeled number 11 in the previous figure.
The Message Add window opens.
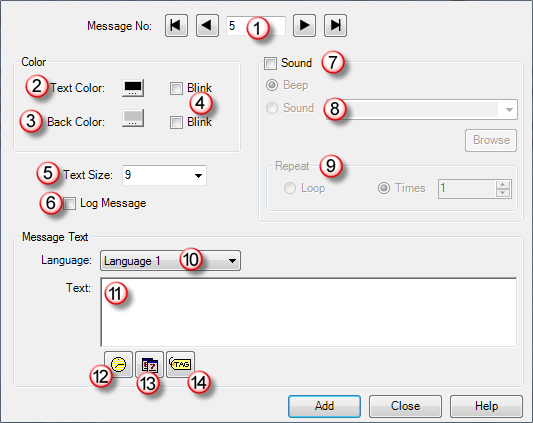
This list details information in the numbered image
-
Msg. No.: click the field to assign a message number or leave the default
-
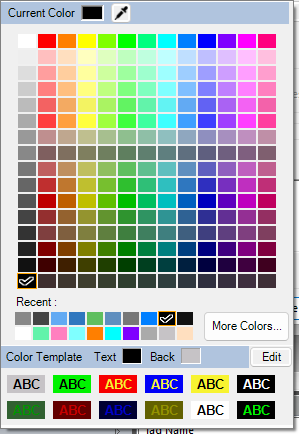
Text Color: click to choose a message text color or leave the default
-
Back Color: message background color
-
Blink: yes in this column indicates that message text or background color blinks
-
Text Size: message text size
-
Log: log the message every time it displays
-
Sound: play a sound when the message displays
-
The default sound is a beep
-
-
Sound Field: select a sound to activate this field
-
Click the down arrow
 to open a drop-down menu of available WAV sound files and click the sound to assign it to the message
 -
Browse to select sounds from the hard drive and add them to the sound drop-down menu library
-
-
Repeat: how many times a sound repeats when the message displays
-
The word Loop in this field indicates the sound plays continuously as long as the Message displays
-
Language: click the down arrow
to open a drop-down list of Languages-
See Language for more information on language setup
-
-
Text: enter message text
-
Maximum number of characters is 200
-
Hover the mouse over the text field and a small window pops up to display Text Entered/Maximum

-
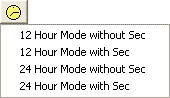
Time: insert a code to automatically display the current time while the message displays
-
Click the Time icon to choose a time format from the pop-up
-
The code automatically displays in the text field discussed above
-
-
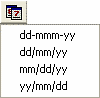
Date: choose a date format from the pop-up to insert a code to automatically display the current date while the message displays
-
The code automatically displays in the text field discussed above
-
Do not erase this code or the date no longer displays with the message
-
To remove the date symbol, click on a time format and select Yes
-
Configure embedded data for the specific message; see Embedded Data Value Window Configuration
Edit a Message
Click on a message in the Message Database window to highlight/select it and then click Edit on the lower left of the screen.
A message edit window opens and displays current message configuration settings, which you can edit.
Embedded Data Value Window Configuration
Select the Tag icon on the Message Add or Message Edit window. Embed up to six tags on any message.
Click the down arrow beside Embedded Data and select the desired data type from the drop-down list. More information for each option is below.
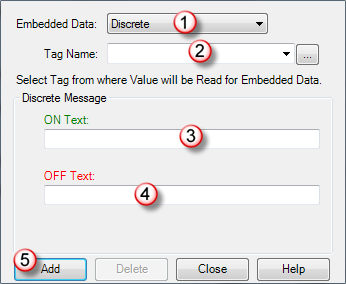
Embedded Data Value — Discrete
-
Discrete Data is the default format.
-
Tag Name: click the down arrow
and select the read value Tag Name. If necessary, click the tag name browser icon to the right of the field, which opens the Tag Name Database. Available tag names appear as well as add, edit, and delete. The tags listed are limited to the data format you choose.
 -
ON Text: enter a message to display when the discrete tag is active.
-
OFF Text: enter a message to display when the discrete tag is not active.
-
Add: click Add to save the value and return to the message add/edit screen.
Embedded Data Value — Numeric
Discrete Data is the default format until you select Numeric from the Embedded Data field and open the window below.
-
Embedded Data: click the down arrow
to select Numeric data format. -
Tag Name: click the down arrow
and select the read value Tag Name. If necessary, click the tag name browser icon to the right of the field, which opens the Tag Name Database. Available tag names appear as well as add, edit, and delete. The tags listed are limited to the data format you choose.
-
Display Data Type: display format.
-
Justify: select from the drop-down menu. Leading zeros display a "0" for every digit that has no value (i.e., 00034567 if you select eight digits.) Leading or trailing spaces do not display.
-
Display Format: enter a common Prefix (left-side field) or suffix value (right-side field) tol always display (e.g., Max. xxxxDeg. F). Tick the Use 1000 Separator box to add a comma separator to the numeric value.
-
Digits: in the Total Digits field, select the total number of digits to display. The maximum number is based on the data type you select in the Tag Name. For the Fractional Digits field, select the total number of digits to include on the fraction portion of the number display.
-
Auto Check: tick the box to allow the object to detect where the decimal should go based on the tag name value.
-
Sample: displays a sample view of the number with your parameters applied.
-
Add: click Add to save the value and enter another one.
Embedded Data Value — String
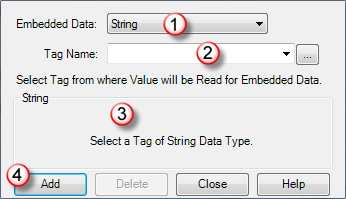
Discrete Data is the default format until you select String an open the window below.
-
Embedded Data: click the down arrow
to select the String data type. -
Tag Name: click the down arrow
and select the read value Tag Name. If necessary, click the tag name browser icon to the right of the field, which opens the Tag Name Database.
-
Available tag names, add, edit, and delete display. The tags listed are limited to the data format you choose (3).
CM254