AutomationDirect CLICK Serial Setup
The following information applies to AutomationDirect CLICK PLC compatible with C-more panels.
The C-more panel is the master when it communicates with this device.
CLICK Programming PLC Port Settings — C0-0x Series
The following applies to CLICK C0-0x series PLCs only.
-
Open the CLICK Programming software.
-
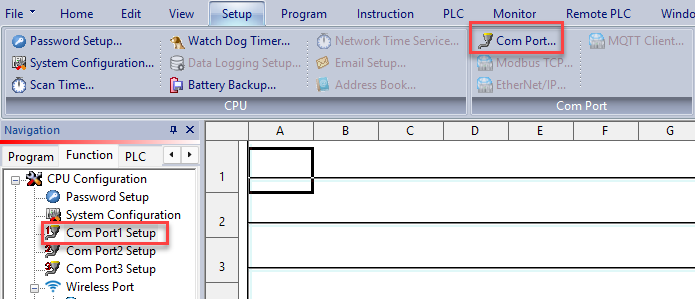
From the Setup tab, select Com Port... and Port1 or Port 2 Setup.
— or — -
from the Navigation window on the left side, click the Function tab, and select either Com Port1 Setup or Com Port2 Setup.
-
Go to Com Port1 Setup or Com Port2 Setup.
CLICK Programming PLC Port Settings — C0-1x and C2 Series
-
Open the CLICK Programming software.
-
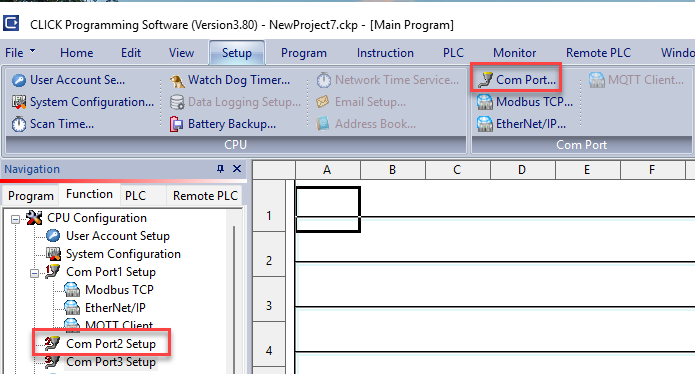
From the Setup tab menu, select Com Port... then Port 2 Setup
— or — -
from the Navigation window on the left side, click the Function tab, and select Com Port2 Setup.
-
Go to Com Port2 Setup.
Com Port1 Setup
| Attention: | The CLICK Com Port Setup Details IP address must match the C-more Protocol Manager. |
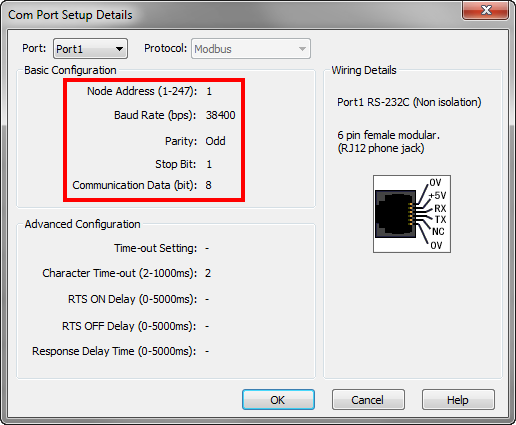
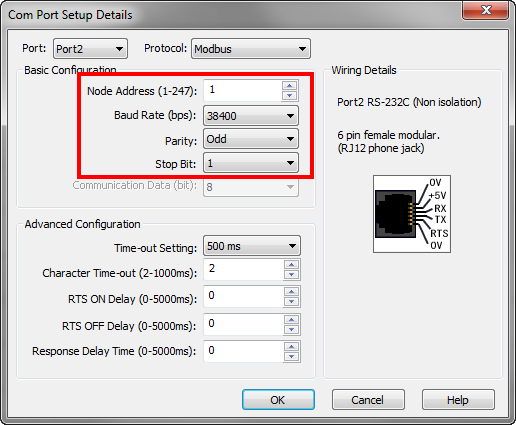
Match these CLICK Com Port Setup Details window settings.
 CLICK Password Setup
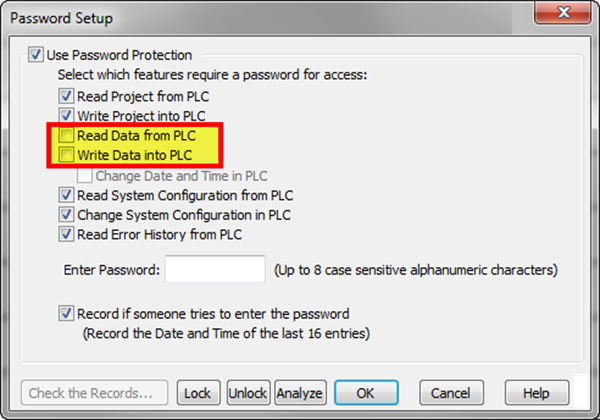
You cannot use the Read Data from PLC and Write Data into PLC features if you use CLICK password.
Com Port2 Setup
| Attention: | These CLICK settings must match the C-more Protocol Manager. |
Match these CLICK Com Port Setup Details window settings.
C-more Protocol Manager Settings
-
Do one of the following:
-
Click the Protocol Manager button on the Home tab
— or —
-
Click the Protocol Manager button on the Setup tab
— or — -
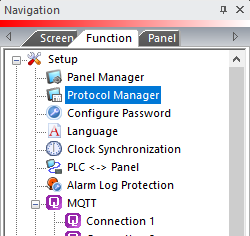
from the Navigation window, click the Function tab, click Setup and then select Protocol Manager.
-
Click the device name on the tree to the left.
-
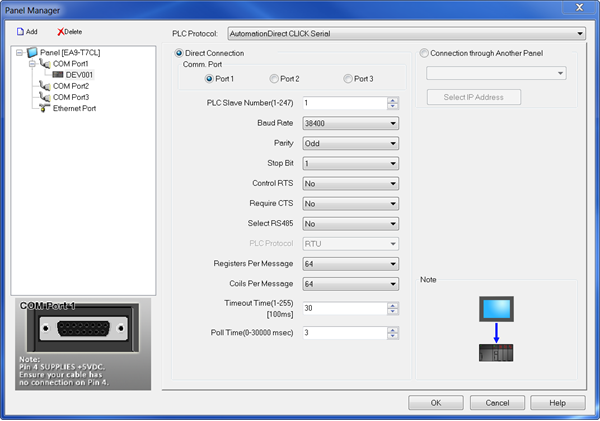
The Device Setup window opens.
-
Click the down arrow and select AutomationDirect CLICK Serial.
-
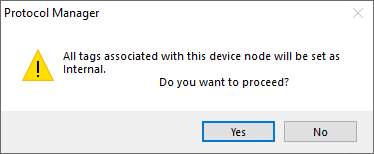
When you select a different PLC Protocol than the one currently in use, the warning message shown below appears.
-
Click Yes to accept.
CLICK Password Setup
You cannot use the Read Data from PLC and Write Data into PLC features if you use CLICK password.
PLC Protocol Settings
Use the CLICK Programming Software screen on the top of this page as reference. The available fields are set in the C-more programming software as defaults, but you can modify them.
Field values must match the field values on the CLICK Programming Software setup explained above.
-
PLC Slave Number (1-247): the PLC port Node Address. Match the Node Address field for Port 2 of the PLC port connected to the panel. If the panel is connected to Port 1 of the PLC, this number is 1.
-
Baud Rate: the connection transmit speed in bits per second (bps). Match the Baud Rate set in the PLC port 2. If you connect the panel to the PLC Port 1, this number is 38400.
-
Parity: match the Parity field set in the PLC port 2. If you connect the panel to the PLC Port 1, set this field to Odd.
-
Stop Bit: extra bits that follow the data and parity bits to mark the end of a transmission. The default is 1. For older systems, set this to 2 if required. Match the value in Parameter P9.02.
-
Control RTS: select Yes in this drop-down to assert the C-more panel RTS signal before every serial transmission. Use Yes when using an RS-232 to RS-485 converter or modem, or when you need to disable the RS-422 driver signal at the end of transmission. In any other case, choose No.
-
Require CTS: select Yes in this drop-down if you use a modem on the C-more serial port for flow control. Otherwise, leave this setting at No.
-
Select RS 485: for 2-wire RS-485 communication, select Yes. Yes is the default. Jumper the SD+ and RD+ pins together and the SD- and RD- pins together.
-
PLC Protocol: this field is read-only.
| Note: | See the CLICK Help file for instructions on changing Date/Time from an external device from C-more. You cannot use the C-more Internal Clock source feature to set CLICK Date/Time. |
CM501