Ethernet Connection Setup — PC to C-more panel
This topic describes how to set up an Ethernet connection from a PC to a C-more panel, including how to browse to the network, select the correct network, and update IP Address settings.
-
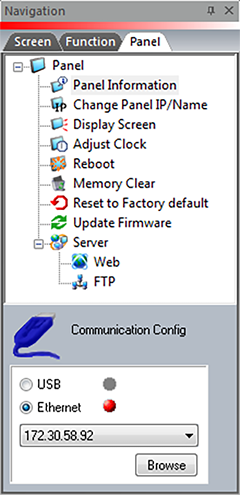
In the C-more software, under the Navigation pane, click the Panel tab.
-
Under Communication Config, click to select Ethernet.
-
Click the Browse button.
-
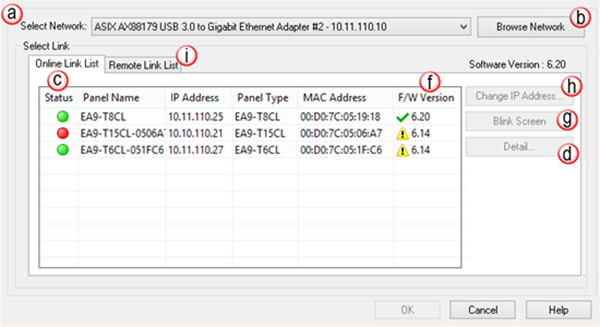
The Ethernet Connection Setup window opens and displays the Online Link List tab.
| Note: | The Browse button in the Read From Panel and Project Transfer windows also opens this tab. |
-
The Online Link List tab displays a list of the C-more panels on the same network as the PC running the programming software.
-
The programming software can browse panels on other subnets to populate the Online Link List, but the panel must be on the same subnet as the PC to blink the screen, read a project, or send a project.
-
Click the Select Network drop-down arrow and select the Network Interface Card (NIC) in the PC.
-
When a PC has multiple network interfaces, use this setting to select a specific interface and limit browsing to that network.
 Example:
Select the local plant network instead of the enterprise information network.
-
Click Browse Network to send a simultaneous broadcast and multicast from the selected NIC. This refreshes the list with any C-more panels connected to the network.
-
C-more panels that respond to the PC appear in the Online Link List.
-
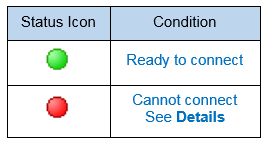
If the Status icon is red, click the Details button on the right side of the window.
-
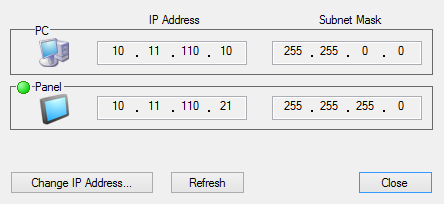
The Connection Details window opens and displays the panel network details.
-
In most cases, the PC and the panel must be on the same network to connect.
-
To edit the IP Address or correct a mismatch, click the Change IP Address button.
| Note: | If the status icon is red, details display. If the status icon is green, there may be notes, but no problems. In some cases, you can still make a connection even though the network addresses do not match. |
-
Click OK.
Unmatched Network Address
The IP Address and Subnet Mask together determine the Network Address with a bitwise AND.

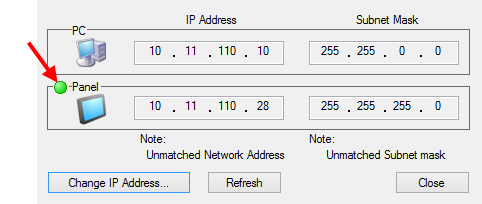
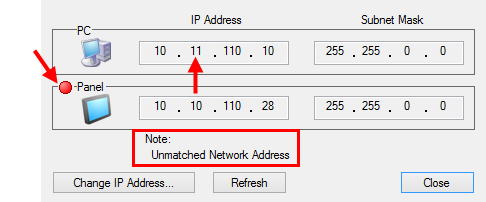 Not a Problem Case:

The PC and panel network addresses do not match but the status indicator is green. The PC and panel connect because 10.11.0.110 is part of the same network as 10.11.0.0.
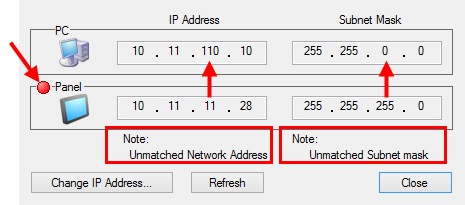
Unmatched Subnet Mask
This is not a problem unless an unmatched subnet mask causes an unmatched network address. Match subnet masks to eliminate the potential for network communication issues.
In the configuration below, the mismatched Subnet Mask results in mismatched Network Addresses, which prevents a connection. If both devices use a Subnet Mask of 255.255.0.0, both Network Addresses become 10.11.0.0 and a connection is possible.
| Note: | See your network administrator for the proper settings for your network. |
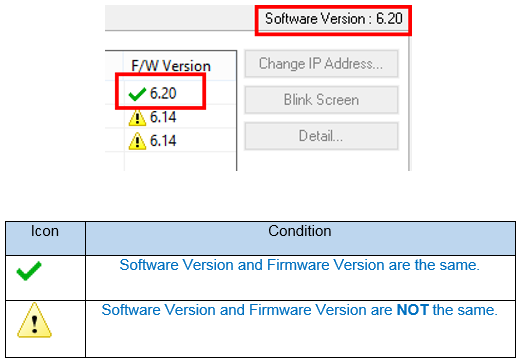
F/W Version
If the software and firmware versions do not match, click Update Firmware to match the panel firmware version to the software version.
-
In the F/W Version field, enter the firmware version number.
-
Click Blink Screen to confirm the correct panel.
-
The panel backlight blinks several times.
-
To edit the Panel Name or IP Address, click Change IP Address.
-
The Change IP Address dialog box opens.
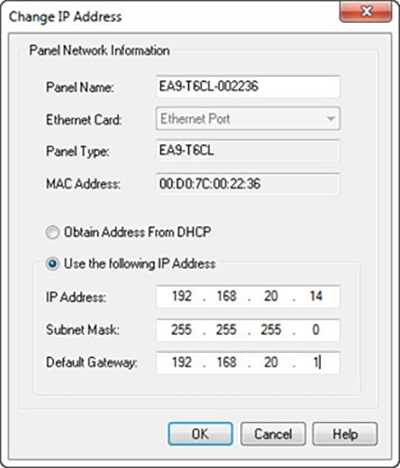
Follow these network settings guidelines.
Obtain Address from DHCP Service
Select this option. The panel queries the network for a DHCP server. If a DHCP server exists, the server automatically assigns an IP Address to the panel. If no DHCP server responds, the panel assumes an IP Address starting with 169.254.xxx.xxx, per APIPA standards.
To program on an established network, use this setting to configure a panel. Do not use this setting on control networks: the DHCP server can change the assigned IP Address without warning, which can cause communication failures.
| Note: | APIPA addresses can change without notice, so best practice is not to use them. |
Use the Following IP Address
On control networks, select this to manually set the IP Address, Subnet Mask, and Default Gateway so that the IP Address does not change.
-
IP Address: the IP Address is unique for each device on the Local Area Network (LAN). If the IP Address is duplicated anywhere on the network, the panel does not communicate properly. See your network administrator for an available IP Address.
-
Subnet Mask: unlike the IP Address, the Subnet Mask is the same for each communicating device on the Local Area Network (LAN). See your network administrator for the proper Subnet Mask.
-
Default Gateway: if a router connects the LAN to another network and C-more communicates with devices on that network, enter the router IP Address. See your network administrator for the proper Default Gateway address.
Connect to Remote C-more panels
The Remote Link List tab connects to panels on a network different from the PC.
In the Ethernet Connection Setup window click the Remote Link List tab.
Example:
A panel on the Internet or a Virtual Private Network (VPN).
The Online Link List uses broadcast and multicast, which routers block by default. Remote Link uses a unicast: it connects directly to the IP Address you enter for a specific panel and is not blocked by routers by default.
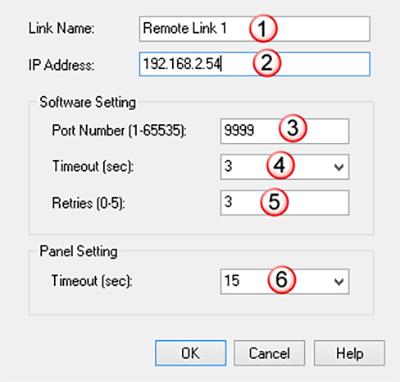
Use this figure and the table below as a guide.
| Remote Link List | ||
|---|---|---|
|
Image Callout |
Field |
Description |
|
1 |
Link Name |
A name that appears only in the Remote Link List. |
|
2 |
IP Address |
The IP Address of the panel to connect to. |
|
3 |
Port Number |
The target panel or remote network router TCP Port number. The C-more panel programming port number is 9999. This number only changes for use with Port Forwarding in a Router. |
|
4 |
Timeout |
The time the software waits for a connection response. Increasing this value may improve a noisy or slow connection. |
|
5 |
Retries |
The number of times the software tries to connect before displaying an error. Increasing this value may improve a noisy or slow connection. |
|
6 |
Panel Setting Timeout |
How long the panel waits after the PC connection is interrupted. A higher value may improve a noisy or slow connection, but also increases the time before the panel becomes available for a new connection. |
CM132