Tutorial: Project Screen with Multi-Language Features |
Topic: CM441 |
Goals:
- Learn to create a basic project screen
- Practice a sample of the steps required to develop projects
- Become acquainted with C-more HMI Programming Software
- Learn to use the Multi-Language feature
Let's develop a screen that includes an Analog Clock and uses a Set Language system button object to control the display language.
Part 1: Start the C-more Programming Software
- Find the C-more Icon
 on the desktop and double-click it.
- The application launches and a splash screen like the one shown below appears for a few seconds while the full program loads:
When the program opens, it's ready to use.
Part 2: Start a Project
- From the Quick Project Toolbar, click on the Start a Project button.
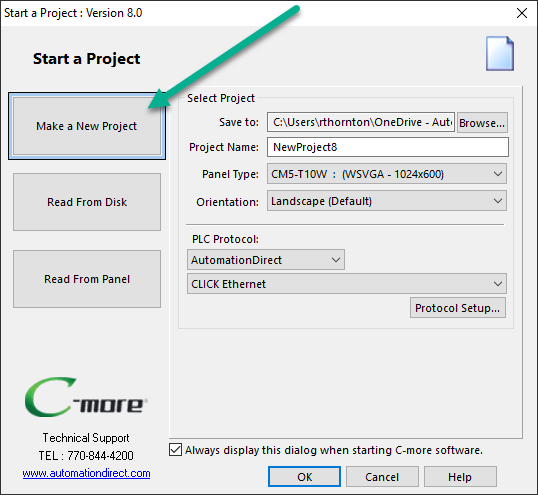
- The Start a Project window opens.
- From this window, the Make a New Project button is selected by default.
- The button has a light blue frame around it.
- If not selected, click Make a New Project.
-
Click on the Browse button to the right of the Save To field to select the location to save the project.
Part 3: Enter a Project Name
The default name given by the application displays on the Project Name field of the Start a Project window.
You may choose to keep this name or click on the field to change it. For this exercise, type "Multi-Lan Sample" in the field.
Part 4: Select C-more Panel Type
From the HMI Type field of the Start a Project window, select your C-more panel from the drop-down list. Your panel model displays on the HMI Type field.
Part 5: Select the PLC Connected to the C-more Panel
- From the PLC Protocol field of the Start a Project window, click on the drop-down list for compatible PLC.
- Select your PLC model from the list.
- The selected PLC model displays in the PLC Protocol field.
- The Protocol Setup button allows the user to configure the protocol for the respective PLC.
Part 6: Verify and Accept Entries
- Verify that all information correct.
- If you want to use the Auto Save and Auto Backup options, select the Click Here text located directly above the OK, Cancel, and Help buttons.
- Once you select and confirm your choices, click on the OK button of the Start a Project window.
Part 7: Set Up Languages
For this project we will use two Languages, English and Spanish.
- Click the Setup tab and select Language.
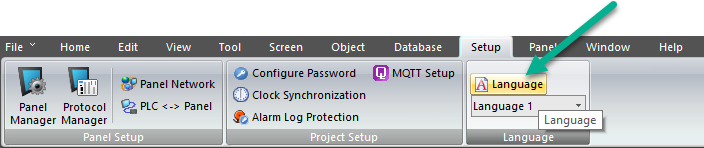
- The Language Setup window shown below opens.

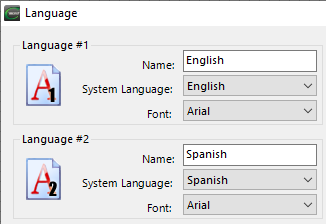
The Language Setup window offers up to nine different languages.
The C-more application is preconfigured for English, Spanish, Japanese, and Chinese. Other languages may require additional setup or may be available in future versions.
The Language Setup screen shows that all nine language settings for C-more are set to English by default.
For this project we will assume that English is the main language.
If English is not the main language, select it from the drop-down list.
- The Name field for Language #1 default is Language 1.
- You may enter a different name.
- For this sample project, change the Name to "English".
- You can use any name you choose (i.e., Inglés, Primary, Main).
- The default font used for the language settings is Arial.
- For this project we will choose a different font.
- Select Arial Bold from the Font drop-down list.
- Language #1 is now setup.
We will assume that Spanish is the secondary language.
- On the Language #2 System Language field, select Spanish from the System Language drop-down list.
- In the Name field, change Language 2 to "Spanish".
How to Enter Special Characters
- You can use any name you choose (i.e., Español, Secondary, Second).
- The default font used for the language settings is Arial.
- For this project we will choose a different font.
- Select Arial Bold from the Font drop-down list.
- Language #2 is now setup.
- Since there are no other languages the setup is complete.
- If you need more languages just repeat the steps above for the next language setting.
- The two edited fields should look like the figure shown below.
Part 8: Select and Setup the Analog Clock Object
With all setup windows now closed, the project is ready to add objects.
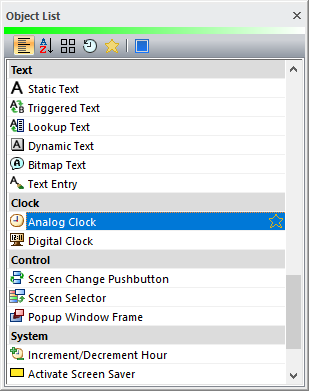
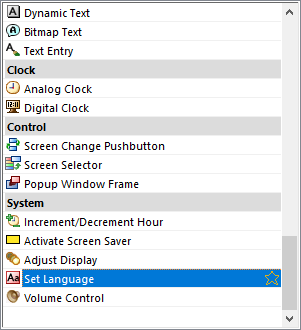
- From the Object List window located in the upper-right side of the screen, scroll down to the Clock list.
- For this project we will use the Analog Clock.
- Double-click Analog Clock shown below.
- The setup window shown below will be displayed.
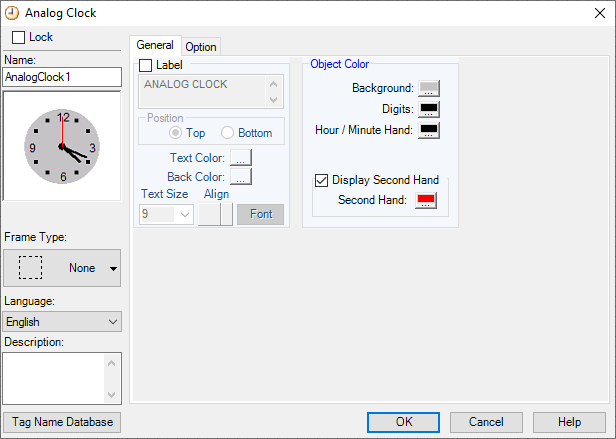
- To make this sample quick and simple, we will only edit some basic setup features.
- To learn more about setup features of this screen, go to More About Analog Clock Setup.
- Make sure the Language selected is English. If not, click on the Language down arrow and select English.
- Click on the Label check box to activate the Label feature.
- The default label text is Analog Clock. For this sample we will leave this text for the English setup. Click the field and replace the text with your choice.
- Click the Language down arrow and select Spanish from the drop-down list.
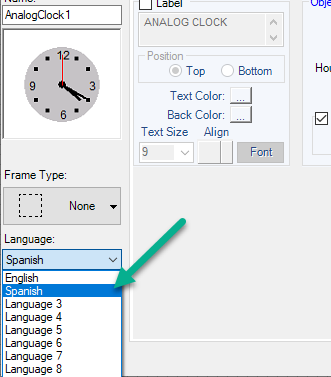
- You won't see a change, but with Spanish language selected you can edit the Label.
- The Label check box should be checked already.
- The default label text is Analog Clock. If you type something else, it will show that text as default.
- For this sample we will type "Reloj Análogo", which is Analog Clock in Spanish.
- After completing above instructions click on the OK button to close the Analog Clock Setup window and accept all entries.
|
|
Note: To use special characters for Spanish words you will need to use the Windows Special Characters entry. The Character Map is always located on the Start > Program Files > Accessories > System Tools > Character Map. |
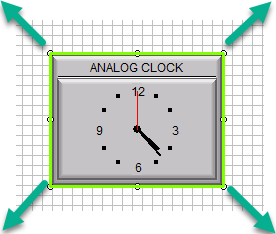
- The Work Area has an Analog Clock object that looks like the figure below.
- Resize by clicking and dragging the handles as shown in the figure below. Resize the object to your liking now.
Part 9: Select and Setup the Set Language Objects
- From the Object List, go to System and double-click Set Language.
- The Set Language Setup window shown below displays.
- To learn more on the setup features of this screen, go to More About Set Language Object.
- Check that the Language selected is English. If not, click on the down arrow and select English.
- Check that the Language selected for the Panel Language under the Select Language field is 1 - English. If not, click on the down arrow and select it.
- Click on the Text field to overwrite the default Language text on the field. Type the word "English" on this field.

- Go back to Language and click on the down arrow and select Spanish.
- Click on the Text field to overwrite the default Language text on the field. Type the word "Ingles" on this field.
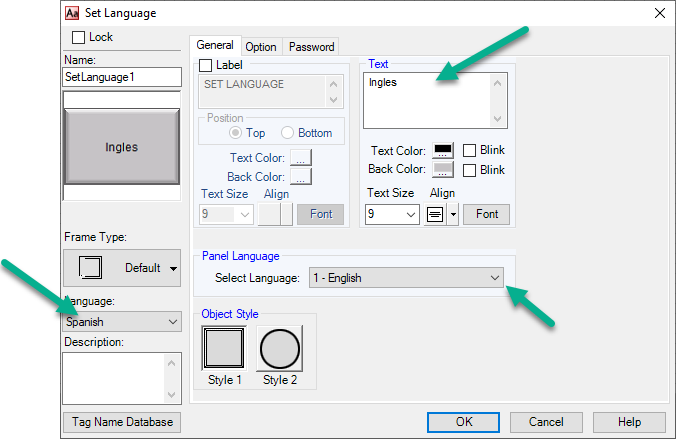
- Click on the OK button to close the Set Language window and accept the entries.
Repeat the steps to add another Set Language object and from the Set Language window.
- Click on Language and select Spanish from the drop-down list.
- Make sure the Language selected for the Panel Language under the Select Language field is 2 - Spanish. If not, click on the down arrow and select it from the list.
- Click on the Text field to overwrite the default Language text on the field.
- Type the word "Español" on this field.
- Go back to Language (labeled "a" in figure above) and click on the down arrow and select English.
- Click on the Text field to overwrite the default Language text on the field.
- Type the word "Spanish" on this field.
- Click on the OK button to close the Set Language window and accept the entries.
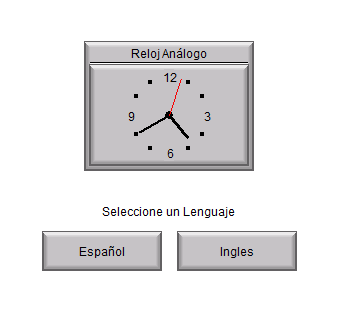
- Click on each button to resize them and arrange them on the work area so your project will look similar to the figure below.
Part 10: Select a Static Text Object
- From the Object List go to Text and double-click on Static Text.
- To learn more about setup features of this screen, see More About Static Text Object.
- Make sure the Language selected is English. If not, click on the down arrow and select English.
- Click on the Text field.
- The default text is Static Text.
- For this sample we will overwrite this text with "Select a Language".
- Click on the down arrow of the Language and select Spanish from the drop-down list.
- You won't see a change, but with Spanish language selected you can edit the Label.
- Overwrite the Text window's default text with "Seleccione un Lenguaje", which is Spanish for Select a Language.
- Click on the OK button to close the Static Text window and accept all entries.
- Click on the Static Text object to resize and arrange it on the work area so your project will look similar to the figure below.
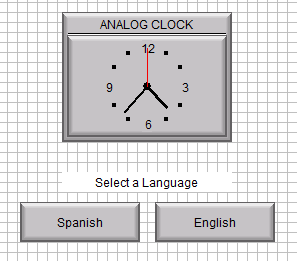
Part 11: Run a Simulation
The simple Multi-Language project is now complete.
To test your project, use the built-in Project Simulator.
- Click on the Simulate Project button on the Quick Project Toolbar.
- The simulation loads and your initial screen should look similar to this:
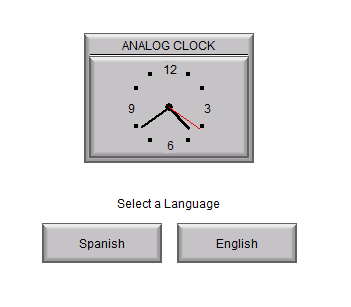
- Click on the Spanish button and the screen will change to the one shown below:
- You can toggle back and forth from English to Spanish by simply selecting the language buttons.
- To learn more about this window, see Learn More about Simulation.
Part 12: Transfer to HMI Panel
Once you are satisfied with the project, it's time to Transfer the project to your Panel. To Transfer the Project, click on the text to open the Send Project to Panel.
