|
|
Topic: P058 |
Choose CPU |
|
|
|
Topic: P058 |
Choose CPU |
|
Choose CPU will browse your network and list all connected CPUs for the Ethernet and USB networks.
Choose CPU can be accessed using four methods:
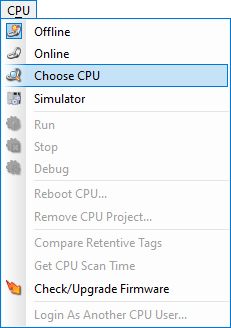
Method 1
Use the Choose CPU Icon on the Control CPU Toolbar.

Method 2
Select the Choose CPU menu item from the CPU Menu.
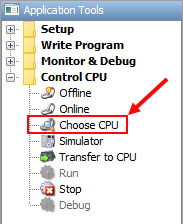
Method 3
Select Choose CPU from the Control CPU topics of the Application Tools panel.
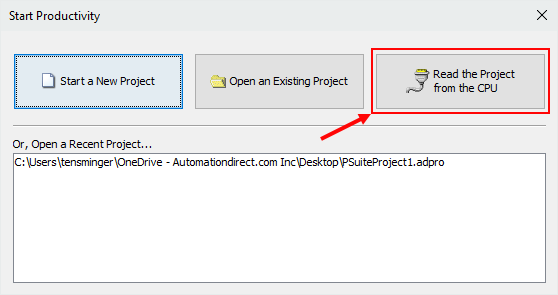
Method 4
Select Read Project From CPU from the Start Project window.
When opened or Refreshed, CPU Connections searches for CPUs using:
Note: The P3-530 CPU does not support programming through the USB port and therefore will only appear as an Ethernet network connection.
Note: If there is no CPU found by the auto discovery, use the 'Add Connection' button.
Note: New CPU's have a default IP address of 10.10.10.10.
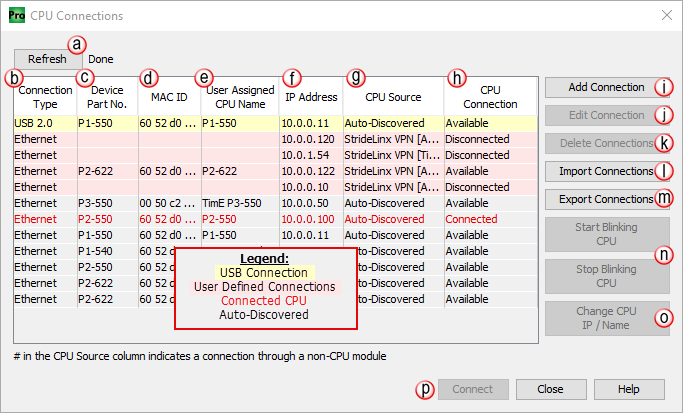
The CPU Connections window provides the following:
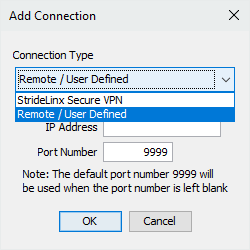
- Select Remote/User Defined or StrideLinx Secure VPN connection type (See the StrideLinx Intergration topic for more details on setting up a StrideLinx connection).
- For a Remote/User Defined connection, enter the IP Address and Port Number to be added to the CPU Connections list.
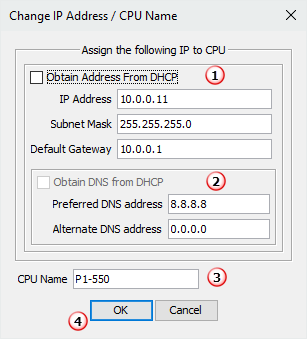
- From this window the CPU Address can be changed by obtaining automatically From DHCP or manually entering the IP Address, Subnet Mask, and Default Gateway text fields. Depending on the CPU Settings of the loaded project, a change made through this interface could be overwritten during the next Stop to Run transition.
- From this window the Preferred and Alternate DNS address can be changed by obtaining automatically From DHCP or manually entering the IP address text fields. Depending on the CPUSettings of the loaded project, a change made through this interface could be overwritten during the next Stop to Run transition.
- The CPU Name can be changed using the applicable text field.
- Select the OK button to apply the changes and close the window.
Note:
Entering an IP Address reserved for specific functions (i.e. loopback, local ethernet, etc.) will cause an error dialogue box to be displayed.
Note: The P2-622 CPU can only be configured with a single DNS address.
Note: If trying to connect to an available CPU and you receive the error, CPU not ready to be connected, this is caused by a previously unsuccessful project transfer and will clear after 2-3 minutes or after a CPU reboot.
For information about StrideLinx Integration, please see the additional information, located here: StrideLinx Integration