Topic: CL247

| PID Autotuning |
Topic: CL247
|
Autotuning can eliminate much of the trial and error of a manual tuning approach, especially if you do not have a lot of loop tuning experience. Performing the Autotuning procedure will get the Tuning Parameters close to their optimal values, but additional manual tuning may be required to get the Tuning Parameters to their optimal values.
WARNING: Only authorized personnel fully familiar with all aspects of the process should make changes that affect the loop tuning constants. Using the Autotune procedures will affect the process, including inducing large changes in the control output value. Make sure you thoroughly consider the impact of any changes to minimize the risk of injury to personnel or damage to equipment. The Autotune in the CLICK PLC is not intended to be used as a replacement for your process knowledge.
The Autotune feature for the CLICK PLC PID loop controller will only run once each time it is enabled. In other words, Autotuning does not run continuously during operation. Whenever there is a substantial change in the process dynamics, such as the mass of process, size of a valve, etc., the tuning process will need to be repeated in order to derive new constants required for optimal control.
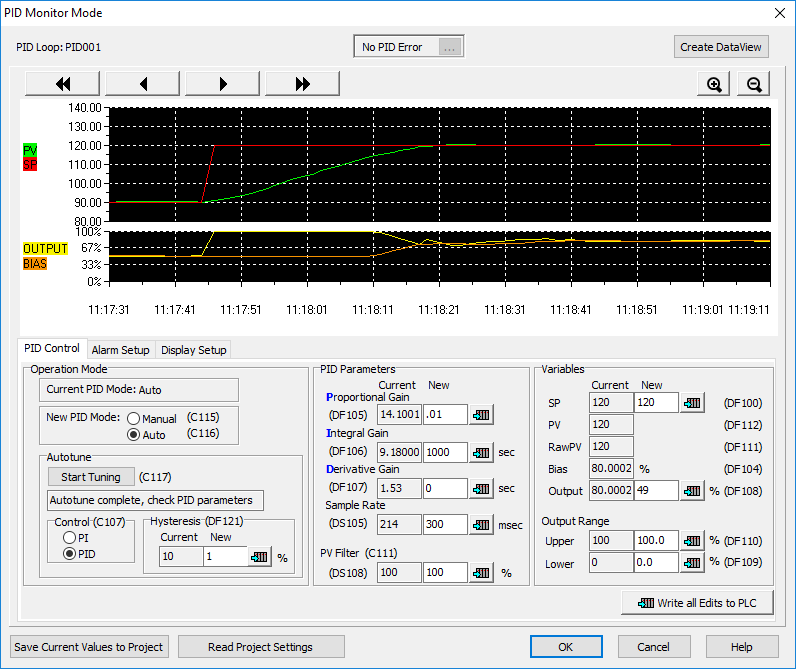
The controls for the Autotune function use three bits and one floating-point number. The PID Monitor can manipulate these values automatically. Or, you may use your ladder logic to access these values directly and use a connected operator interface. The individual control bits allow you to select PID or PI control and start the Autotune procedure.
The floating-point number allows you to select a Hysteresis for the tuning procedure. The Hysteresis is the percentage of the SP that the PV must go beyond the SP before the Control Output changes values in the next bump. A larger value will result in a slower tuned loop but may be necessary to account for noise in the PV.
If you select the PI control, the Autotune procedure sets the Derivative Gain to 0.0. The Autotuning Mode Running Indicator bit and PID Error Code word report the Autotune status and error code. An Error Code of 200 indicates a problem with Autotune.
|
Autotuning Bits and Registers |
|
|---|---|
| Address | Function |
| Cn+07 |
Autotune PID Algorithm Selection (PI/PID) |
| Cn+17 |
Autotune Mode Start Request |
| Cn+27 |
Autotune Mode running indication |
| DSn+00 |
PID Error Code |
| DFn+21 |
Autotune Hysteresis |
Before starting the Autotune procedure:
To start the Autotuning process:
The following diagram shows the events which occur in the Autotune cycle.
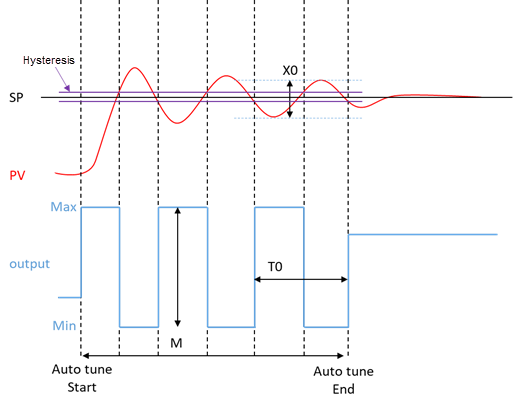
When the PV has crossed over the SP by the Hysteresis amount, the Control Output is adjusted to the opposite extreme.
This is repeated 2 more times.
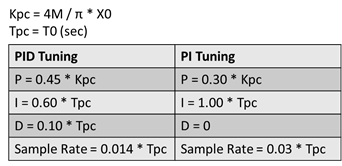
The Autotune process computes Kpc and Tpc from M (Bump size), To (bump period) and Xo (amplitude of the PV as a percentage of the PV Span).
Tuning Parameters (P, I, D and Sample Time) are calculated according to the Zeigler-Nichols equations, shown below and automatically updated in the PLC addresses DFn+5, DFn+6, DFn+7 and DSn+05 respectively.
The loop switches to Auto mode.

|
Notes: If the response speed of PV is too fast, the optimum value may not be calculated. When set to Reverse-Acting, the output will be inverted. |
|
|
Note: If your PV fluctuates rapidly, you need to use the PV Filter explained in the PID Configuration Help topic, or more hysteresis or create a filter in ladder logic (see PV Filter Example). |
When the PV is fluctuating or noisy, there are a couple of approaches you can take to achieve accurate tuning constants. You can enable the PV Filter or you can increase Autotune Hysteresis.
The PV Filter filters the Raw PV and can reduce the noise the PID loops sees, but it also causes lag in the PID control resulting in both a slow reacting and a slowly tuned loop. This is good to use if you do not want to see the noise in the PV during normal process run-time.
The Autotune Hysteresis has the same effect but only during the Autotune process. The noise in the PV is ignored. The higher the Hysteresis the more noise is ignored. This will result in slower tuning, but will not cause lag in the PID control. If you do not mind seeing the noise in the PV, this is a better parameter to adjust to get more accurate tuning constants..