Topic: CL098

| Data View |
Topic: CL098
|
The Data View is a tool that you can Read and Write values in the Memory Addresses of the CLICK. There are two operation modes:
All Data View windows are saved as a part of the CLICK project automatically. You can also Import and Export each Data View table separately to allow transfer to another CLICK project.
When the Edit button on the top left is not pressed, the Data View is in View Mode. In this mode, you can Read the Current Values of Memory Addresses, but it is not allowed to change their values.

1 Edit: Clicking Edit puts the Data View window in Edit Mode, which allows changes to the values of the Memory Addresses. (see Edit Mode below). (Shortcut Key: Ctrl + E)
2 Fill Down: Select a Memory Address by clicking in its cell and click the Fill Down button to add consecutive Memory Addresses to the table in subsequent rows. Each click increments the memory address by one. (Shortcut Key: Ctrl + Return).
|
|
Note: If you select an Address that is not the last Address on the list, clicking Fill Down will overwrite subsequent Addresses. Be sure to insert additional rows if needed by using the Insert Row command available from the right click menu. |
|
3 Write All New Values: This is only available in Edit Mode discussed below.
4 View Override: This is only available in Edit Mode discussed below.
5 Address: Type in Memory Addresses, or click the cell and then click the Address Picker icon ![]() to open the Address Picker where you can browse the Memory Address table.
to open the Address Picker where you can browse the Memory Address table.
6 Nickname: If the Memory Address has a Nickname, it is displayed in this column. If you want to add or change the Nickname, move the cursor to the Address column on the same row and click the Address Picker icon ![]() to open the Address Picker. In the Address Picker, click Edit Mode button on the left bottom and type in the new Nickname.
to open the Address Picker. In the Address Picker, click Edit Mode button on the left bottom and type in the new Nickname.
7 Current Value: The Current Value held in the Memory Address is displayed. When the Current Values change, the Value is displayed in red.
8 Viewing Format: The Viewing Format allows you to select the format to display the Current Value and New Value for each Data Register. Four formats (Integer, Real, Exponential and Hex) are available. The Viewing Format for the Bit Memory Addresses is fixed to Bit.
9 Export: The Data View table is stored in the project file automatically by clicking the Close button. Clicking the Export button allows to save the Data View table as an external file. You can Import the file into another project later.
When the Edit button on the top left is pressed, the Data View is in Edit Mode. In this mode, you can Read the Current Values of Memory Addresses and change their values.
1 Edit: Click on Edit to bring the Data View window back to View Mode. (Shortcut Key: Ctrl + E)
2 Fill Down: Select a Memory Address by clicking in its cell and click Fill Down button to add consecutive Memory Addresses to the table in subsequent rows. Each click increments by one. (Shortcut Key: Ctrl + Return)
|
|
Note: If you select an Address that is not the last Address on the list, clicking Fill Down will overwrite subsequent Addresses. Be sure to insert additional rows if needed by using the Insert Row command available from the right click menu. |
|
3Write All New Values: Writes All New Values into the CLICK PLC. (Shortcut Key: Ctrl + W).
4 View Override: To use the Override function, click on the View Override checkbox. The OVR button is displayed for each Bit Memory Address that supports the Override function. See item 10 to learn how to use the Override Function.
5 Address: Type in Memory Addresses, or click the cell and then click the Address Picker icon ![]() to open the Address Picker where you can browse the Memory Address table.
to open the Address Picker where you can browse the Memory Address table.
6 Nickname: If the Memory Address has a Nickname, it is displayed in this column. If you want to add or change a Nickname, move the cursor to the Address column on the same row and click the Address Picker icon ![]() to open the Address Picker. In the Address Picker, click Edit Mode on the left bottom and type in the new Nickname.
to open the Address Picker. In the Address Picker, click Edit Mode on the left bottom and type in the new Nickname.
7 Current Value: The Current Value held in the Memory Address is displayed. When the Current Values change, the Value is displayed in red.
8 New Value: For the Bit Memory Addresses, you can change the status by double-clicking the ON and OFF buttons. For the Data Registers, enter a value that matches the data type. You have to double click the Write-to-PLC icon ![]() in the Write column to transfer the New Value to the CLICK PLC.
in the Write column to transfer the New Value to the CLICK PLC.
9 Write: Double-clicking the Write-to-PLC icon ![]() transfers the New Value to the CLICK PLC.
transfers the New Value to the CLICK PLC.
10 Override Column: The OVR button is displayed only for the Bit Memory Addresses that support the Override function. The Override function is OFF by default. Double-click the OVR button to enable the Override function. When the Override function is ON, you can change the status of the Bit Memory Address manually by clicking the ON and OFF button in the New Value column.
11Viewing Format: The Viewing Format allows you to select the format to display the Current Value and New Value for each Data Register. Four formats (Integer, Real, Exponential and Hex) are available. The Viewing Format for the Bit Memory Addresses is fixed to Bit.
12Export: The Data View table is stored automatically in the project file by clicking the Close button. Clicking the Export button allows to save the Data View table as an external file. You can Import the file into another project later.
There are two methods to Export a Data View table:
With both methods, the following Save As dialog opens. Type a File Name. The file extension (.cdv) will be added automatically.
![]()
There are two methods to Import a Data View table into the currently opened CLICK project:
With both methods, the following Import Data View dialog will open. Select a Data View file (.cdv) to Import.
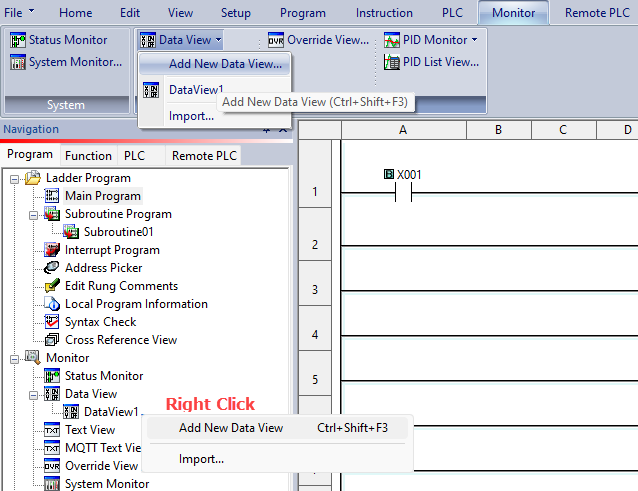
Open a New Data View Window by selecting Monitor > Data View > Add New Data View (shown below), by clicking on the Data View Toolbar icon![]() , or by using the Keyboard Shortcut, Ctrl + Shift + F3.
, or by using the Keyboard Shortcut, Ctrl + Shift + F3.
Once either of the methods discussed above is used, the New Data View window shown below will open. From this window enter the name for the New Data View table that will be created and then click the OK button to accept. This will open the newly created Data View window, which is discussed on the next subject. Notice that there is a limit of 24 Characters for this entry.