|
|
Topic: P261 |
CPU Data Remote Monitor App |
|
|
|
Topic: P261 |
CPU Data Remote Monitor App |
|
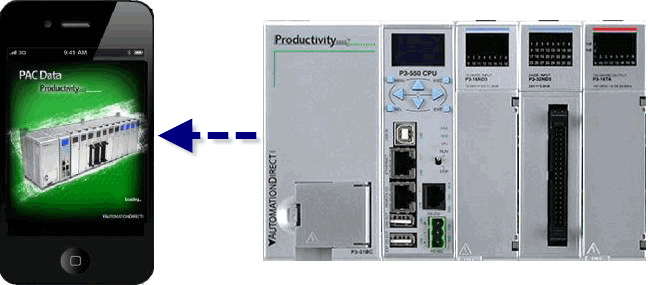
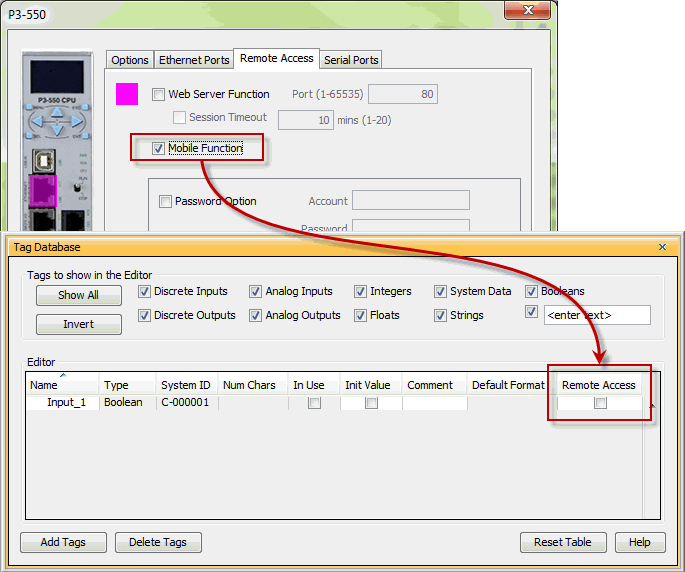
The CPU Data Remote Monitor App allows the user to connect to remote CPU systems using Wi-Fi, or cellular network connections. The remote user can monitor the local CPU system and user tags configured for remote access inside the tag database of the CPU. In order to use the CPU Data app with a P3000, you must enable the Mobile Function in the P3-550 or P3-530Hardware Configuration under the Remote Access tab. Afterwards, check each tag in the tag database that you would like to have remote access to.
The CPU Data Remote Monitor App can be downloaded from the iTunes App Store to any iPhone/iPad/iPod Touch devices running iOS version 6.1.3 or later.
The CPU Data Remote Monitor App allows authorized users to connect their iPhone/iPad/iPod Touch device to the CPU from a WI-Fi or cellular connection. The remote user can monitor the tags that are in a remote CPU. This can reduce the need for the user to be onsite to view information that can help troubleshoot a CPU system as well as monitor production data remotely.
This feature allows authorized users the ability to:
Requirements to use the Remote Access feature are:
Firewall: If you plan to have external users accessing the CPU via the Internet, it is highly recommended that a Firewall be used for security purposes. This is true for any device that can be accessed from the Internet. Although the CPU has a Remote Access account for assigning passwords, it is more secure and recommended that you use a Firewall to reduce the chances of unauthorized access. Most routers offer Firewall support. For more information on setting up a Router for Remote Access, see topic Router Setup: Remote Access.
VPN: Although the Remote Access feature for the CPU can be configured with password protection, connecting the CPU on an Enterprise network or the Internet exposes security risks. A secure and encrypted VPN connection is highly recommended if the CPU will be accessible from the Internet. A VPN (Virtual Private Network) uses encryption and other security mechanisms to ensure that only authorized users are allowed to connect and that the data cannot be intercepted. A VPN greatly reduces the chances of malicious behavior and unauthorized connections.
Project Protection: If the project loaded in the CPU has the USER ACCOUNT set up to prevent unauthorized upload or download of the project, then users who go online with the CPU cannot transfer or edit the project using the IP Address that they have been given for the Remote Access Connection. The project should be protected if the panel is located on the Internet and users know the IP Address.
Remote Access User Account: A user account can be configured in the Remote Access tab of the CPU hardware configuration.
Note: If the Account Name and Password are configured for the account and the incorrect user name and/or password is entered, access to the CPU will not be granted and the login screen will reappear prompting the user to reenter the username and password.
Make sure the iPhone/iPad/iPod Touch cellular or Wi-Fi features are enabled and that you are connected to the network. The CPU must be configured to enable the Remote Access feature. See Remote Access Setup for details. These settings are stored with the CPU project and loaded to the CPU with the CPU programming software.
The CPU Data Remote Monitor App workspace is the Graphical User Interface that is used to set up communications, select a CPU for connection, and monitor tags that have been set for Remote Access within the remote CPU. The workspace is visible when there has not been a connection made to a CPU. Once connected, the workspace will change to a data view displaying tags in the CPU that have been set for Remote Access.
The image above shows the CPU Data Remote Monitor App Workspace, from this screen you can:
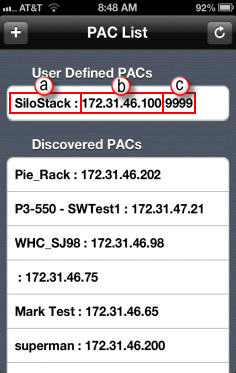
The Browse List will display the following information from the remote CPU. If the entire IP Address is not visible, rotate your mobile device to view the rest of the IP Address.
The Browse feature does have some limitations:
Routers: Many routers do not support multicast. If you are connected through a router and the browse multicast does not function, you will need to input the IP Address of the CPU manually. This connection will then show up each time the app has opened. You can only connect to it when you have access to the network the CPU resides on.
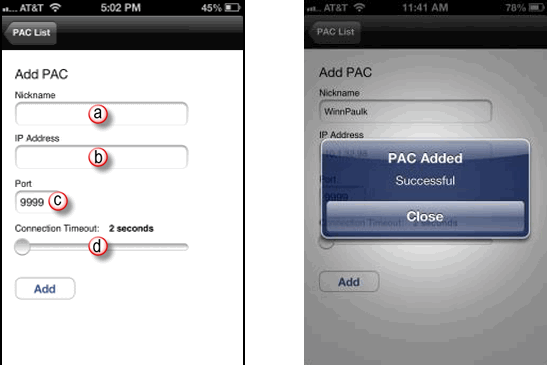
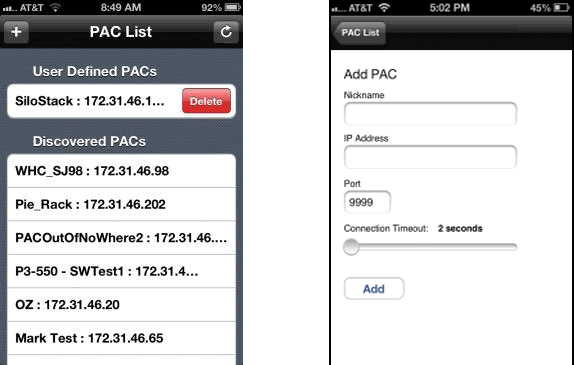
To add a connection select the "+" button from the CPU List Workspace window. The screen will change to the dialogue box above.
Select the Add button and you will get the CPU Added Successful message box. Choose Close then choose the CPU List button and the connection you added should be listed under User Defined CPUs. User defined connections will be displayed in the CPU List even if they are NOT on the network your mobile device is connected to. For these connections to work you have to make sure your CPU network path is correct and your device can access that network.
To delete a user defined connection, swipe your finger from right to left across the connection you are trying to delete. The delete button will appear as shown below.
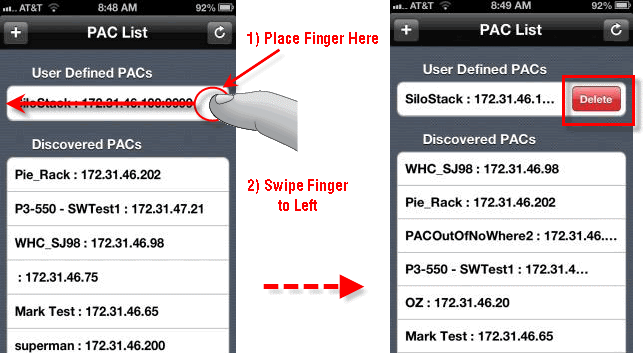
Note:VPN (Virtual Private Network) and Cellular connections do not support Ethernet multicast. You will need to input the IP Address of the CPU manually through the User Defined Connections.
Once you have discovered or defined connections that are accessible by your mobile device you can choose the connection you wish to monitor by selecting it on the touch screen. If the CPU is accessible and the mobile function has been turned on in the CPU hardware configuration (see Remote Access Setup) you should see a list of tags that were chosen in the tag database to be accessible remotely. See the example below.
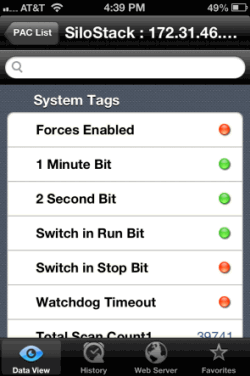
If the tags are discrete tags they will have an icon that is Red when OFF and Green when ON. Numeric tags will display the current value of the tag. String tags will display the alphanumeric value that is contained within the tag. The tags will be listed in groups according to the data type they are associated with. You can use the touch screen to scroll up or down to see all the tags that are accessible. If you know the name of the tag you wish to view or what the tag name starts with you can start typing into the search box at the top of the list to display a list of tags matching your entry. You may not be able to view long values in a string tag but rotating the device to a horizontal position will allow more data to be viewed.
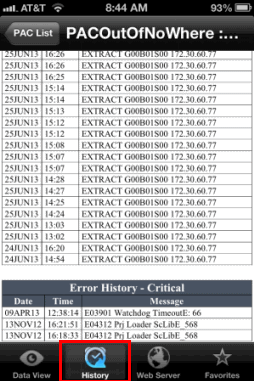
By selecting the History icon at the bottom of the screen you can view the History Log that is maintained within the CPU. In this log you can view the Event History, Critical Error History, and Non Critical Error History. This feature allows you to remotely see what events or errors may have taken place on the CPU and when.
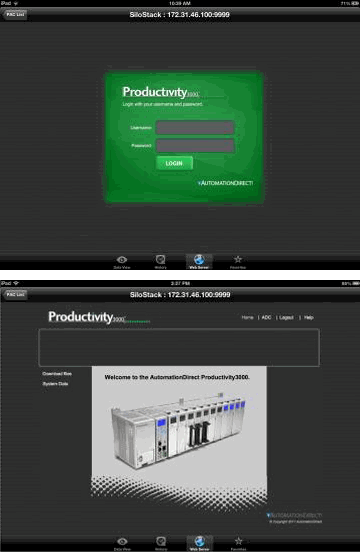
If the Web Server functionality on the CPU is enabled, selecting the Web Server icon at the bottom of the touch screen will allow you to remotely view the Web Server on the CPU. This feature will allow you to view various system tags within the CPU as well as look at any data files you may be logging to a thumb drive.
If you select the Favorites icon at the bottom of the touch screen you can see a list of tags that have been added to your list of favorites. To add a tag to your favorites place your finger to the far right of the tag name and swipe from right to left. Select the star shown in the yellow circle to add the tag to your favorites. The arrow in the yellow square will return the data view screen back to normal.

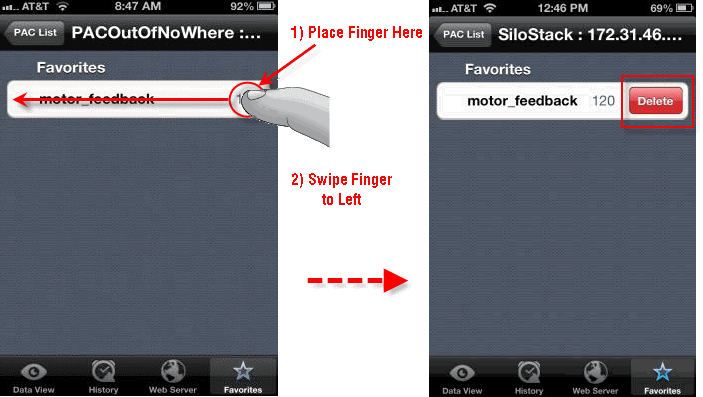
Once added to your favorites you can find the tag data in the favorites selection or in your data view under your favorites group. To delete a tag from favorites place your finger to the far right of the tag you wish to delete and swipe from right to left. Then choose Delete shown in red box below.
