|
|
Topic: P213 |
Forcing Tags |
|
|
|
Topic: P213 |
Forcing Tags |
|
In this topic we will describe the actions, expectations and indications when Forcing a value within the Productivity Suite controller.
Forcing allows you to override Tag values in the CPU. Any Tag that can be edited with Data View, excluding array elements and strings, can be Forced. Also, Tags assigned physical Input and Output points can be Forced. Up to 64 Tags may be Forced at a time.
There are two ways to initiate Forcing of a Tag:
Note: The Productivity CPU supports up to 64 Forceable Tags per project. Exceeding this number will cause an "There cannot be more than 64 Forceable Tags" Error.
Note: The Forces Enabled bit (a system tag) will be True (On) as long as there are any tags that are forced (on or off). The Forces Enabled bit is only False (Off) when all forces have been removed.
When Initial Forcing (Init Forced checked) is set for a Tag, that Tag will be Forced as soon as the project goes into Run mode. Init Forced is useful when a Forced value needs to be in place for an extended period, so the Forcing needs to survive power cycling to the CPU.
Set up the Forcing in the Tag Database by checking Forceable and Init Forced, and assign an Init ForceValue from the Tag Database window as shown below. After this is completed and the project is transferred, each time the CPU goes to Run mode (power-up into Run included), Forcing and the Init Force Value specified in the project will be applied.
Data View can be used to temporarily adjust the Forcing on a Tag that is Initial Forced. Forcing can be temporarily stopped, started and the Tag value changed. If changes made to a Forced Tag in Data View need to be retained through a Stop-Run transition, update the Tag Database with the new parameters, and Transfer the project.
Caution: It is important to remember that changes made to Forcing using Data View are not permanent. Marking a Tag Retentive will NOT update the Init Force Value. Regardless of changes made in Data View, the next time the CPU goes from Stop to Run mode, the Init Forced and Init Force Value settings will again be used.
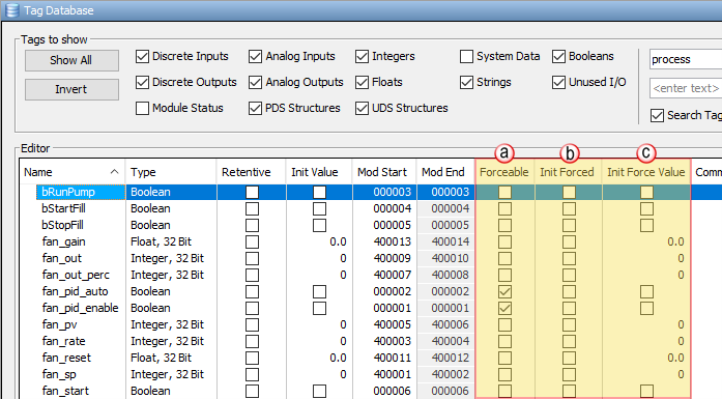
There are three columns (shown above) within the Tag Database that affect the Forcing of all Tags.
- A check mark in a box equals a logical 1 or ON, and
- An unchecked box equals a logical 0 or OFF. The value placed in this field for Integer or Floating Point Tags will be written into the Tag.
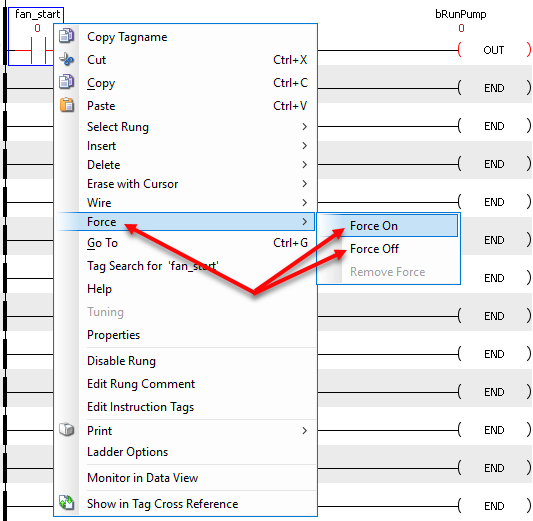
When Temporary Forcing is used for a Tag (Init Forced not checked), that Tag can only be Forced manually, using Data View or Force from ladder. The Forcing for that Tag will be cleared each time the system goes to Run mode. To Enable Temporary Forcing for a Tag, mark the Tag as Forceable in Tag Database and Transfer the project to the CPU. Then use Data View or Force from ladder to manipulate Forcing.
Note: If an instruction does
not support Force from
ladder, it will be shown by hovering over the
Force options.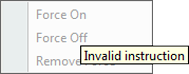
Note:
If an instruction can be
Forced, but is not selected
as Forceable in the
TagDB it will be shown by
hovering over the
Force options.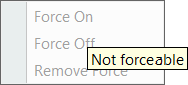
Caution: Although Forcing can be adjusted in Stop mode with Data View, please note that all Temporary Forcing will be lost when the CPU is switched to Run mode. If values need to be Forced as soon as the CPU goes to Run, use Initial Forcing instead.
The
Force Indicator is
a small lock with a red arrow
 that is displayed on the
Data View window
or ladder instruction to indicate that the
Value of that
specific Tag is
currently being
Forced. The
graphic shown below provides an example of both
Data View window
and ladder instruction with
Force Indicators
being displayed.
that is displayed on the
Data View window
or ladder instruction to indicate that the
Value of that
specific Tag is
currently being
Forced. The
graphic shown below provides an example of both
Data View window
and ladder instruction with
Force Indicators
being displayed.
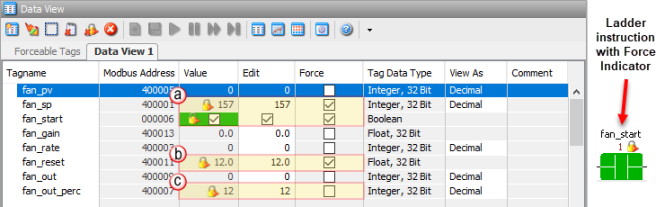
Tags can be Forced by clicking the appropriate check box under the Force column. When Forcing Tags through the Data View window, the Forces will NOT be active until the Send Edits button is selected. Once the Send Edit button is selected, the Force Indicators will display the newly added Forces.
From the graphic above we see the following:
- The Tag Name (fan_sp) is Forced and the Force Indicator shows that a Value of 157 is being Forced. Also, The Tag Name (fan_start) is Forced and the Force Indicator shows that the Fan is Forced and should be running.
- The Tag Name (fan_reset) is Forced however, since the Force Indicator is NOT displaying it shows that this Tag has not been Forced yet. This is because the Force checkbox has been selected but the Send Edits button has not been clicked yet. Once the Send Edits button is clicked the Force Indicator will display showing the Tag is being Forced.
- The Tag Name (fan_out_perc) is Forced and the Force Indicator shows that a Value of 12.0 is being Forced. However, the Force checkbox shows that this Tag is not being Forced. This is because this Tag had been previously Forced and this is why the Force Indicator is displayed. This graphic shows that the Force checkbox was unchecked after the Tag had been Forced but the Send Edits button has not been clicked yet. Once the Send Edits button is clicked, the Force Indicator will turn OFF indicating the Tag is no longer Forced.
There are three indications that Forces are active on your controller.
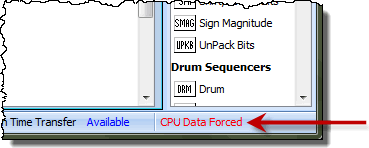
Force Indicator is shown on any contact or coil that is Forced either ON or OFF:

Note: Only Forced Tags with an Initial Force value specified in the Tag Database will be retained after a Stop to Run transition, Stop Mode transfer, or a power cycle. All Forced values are retained during a Run Time transfer.
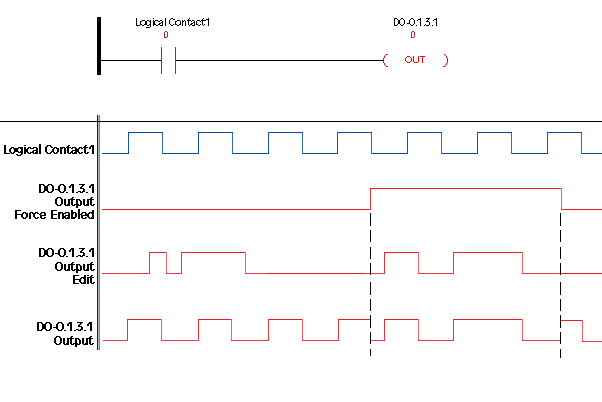
The chart below shows how the states of a Digital Output are varied when forces and edits are applied.
The ladder rung at the top of the chart shows the logical arrangement of Logical Contact1 and Digital Output DO-0.1.3.1. Under normal operation, Logical Contact1 is driven by a clock pulse. This clock pulse is then fed to the Digital Output DO-0.1.3.1. Edits written to the contact or the coil from the Data View window within the software will be written one time and will not be forced. With the clock pulse driving the contact, any software edits made to this contact will be allowed but will be overwritten by the logic on the very next scan. Any software edits made to the output will not be allowed and will not register. Edits can only change the state of the output if there are no other logistic or outside factors influencing the output.
In order to change the state of Logical Contact1 or Digital Output DO-0.1.3.1 while the clock pulse is driving it, a force must be introduced. The DO-0.1.3.1 Output Edit line represents edits sent to the digital output from the Data View window. The DO-0.1.3.1 Output Force Enabled line shows the point at which the software forces the output edit to take effect. The dotted lines represent the force being enabled and then disabled by the user. When the force is enabled, any edits made will register at the output regardless of Logical Contact1’s state. When the force is disabled, all output edits will be ignored.