C-more Remote HMI App |
Topic: CM630 |

|
Caution: The C-more Remote HMI App allows the user to connect to remote C-more panels from Ethernet, Wi-Fi, or cellular network connections. The Remote user can fully operate and monitor the local HMI system and affect the function and control of the application just as the local operator controls it. Proper Control, Security and Safety Procedures should be considered and implemented when utilizing the Remote Access feature. There are various ways to control, limit and log remote users as explained in the topic Set Up Remote Access. |
App Download Location
The C-more Remote HMI App is available from both Apple App Store and Android Play.
Device Requirements
- iPhone/iPads running iOS version 4.3 or later
- Android devices running version 4.4 or later
Refer to the Set Up Remote Access section of the help file to configure the C-more panel to allow the C-more Remote HMI App to function.
|
|
Note: It is recommended that a remote connection be set up via a Web Browser before attempting to connect to the remote C-more panel with the C-more Remote HMI App to ensure Remote Access has been configured properly. |
Remote Access Benefits
The C-more Remote HMI App allows authorized users to connect their mobile device to the C-more panel from a WI-Fi or cellular connection. The remote user can fully operate and/or monitor a remote C-more panel. This can reduce the need for the user to be on site to view or operate the C-more panel. The HMI Project can also be configured so that the local operator can enable or disable control at any time by using assigned tags on one of the project screens.
This feature allows authorized users the ability to:
- Remotely control the screen operations of the C-more panel as if touching the panel itself.
- Remotely monitor real time screen operations.
- Allow system integrators to support on-site end users.
- Remotely troubleshoot and test the C-more project application.
- Remotely view, zoom, and save screen captures of active screens.
Requirements
Requirements to use the Remote Access feature are:
- iPhone/iPad/iPod Touch iOS
version 4.2 or later
— or — - Android device with version 4.4 or later
- C-more panel with Ethernet port
- C-more Programming Software to program and configure a panel to support the C-more Remote HMI App.
- The C-more panel must have compatible network settings with the device running the C-more Remote HMI App.
Security Concerns
Firewall
If you plan to have external users accessing the C-more panel via the Internet, it is highly recommended that a Firewall be used for security purposes. This is true for any device that can be accessed from the Internet. Although C-more panels have a Remote Access account for assigning passwords, it is more secure and recommended that you use a Firewall to reduce the chances of unauthorized access. Most routers offer Firewall support.
VPN
Although the Remote Access feature for the C-more panel can be configured with password protection, connecting the C-more panel on an Enterprise network or the Internet exposes security risks. A secure and encrypted VPN connection is highly recommended if the C-more panel will be accessible from the Internet. A VPN (Virtual Private Network) uses encryption and other security mechanisms to ensure that only authorized users are allowed to connect and that the Data cannot be intercepted. A VPN greatly reduces the chances of malicious behavior and unauthorized connections.
Project Protection
If the project loaded in the C-more panel was saved as a Protected Project File, then users who go online with the panel cannot save or edit the project using the IP Address that they have been given for the Remote Access Connection. This keeps users from intentionally or unintentionally saving or editing the project file. The project should be protected if the panel is located on the internet and users know the IP Address.
Remote Access User Accounts
Three Remote Access user Accounts are configured and stored in the panel project. Each Account has a Permission Level field that can be configured by the user. The user accounts are for Remote Access permissions. Each of these three accounts has three possible permission levels that can be assigned to the account.
These permission levels are:
- View Only
- View and Screen Change (Screen Change Push Button only)
- Full Control
Account Passwords
Each Remote Access user account allows passwords that are configured and stored in the panel project. If the password is assigned in the panel project, the C-more Remote HMI App user will be required to type in the correct user name and password in order to view and control the C-more panel with the app.
|
|
Note: If the Account Name and Password are configured for the account and the incorrect user name and/or password is entered, access to the C-more panel will not be granted. A Message box will appear notifying the user that the Data entered is invalid and the login screen will reappear. |
Getting Started with the C-more Remote HMI App
Make sure your mobile device cellular or Wi-Fi features are enabled and that you are connected to the network. The C-more panel must be configured to enable the Remote Access and Control feature. See Set Up Remote Access for complete details. These settings are stored with the C-more panel project and loaded to the panel with the C-more programming software.
Remote HMI Workspace
The C-more Remote HMI App workspace is the Graphical User Interface (GUI) that is used to set up communications, select a panel for connection, and control the interactions with the remote C-more panel. The Workspace is always visible when there has not been a connection made to a C-more panel. Once connected, the Workspace will remain visible for about five seconds and then disappear. When the screen is touched by the user, the workspace will reappear and stay active as long as it is in use, timing out five seconds after the last touch.
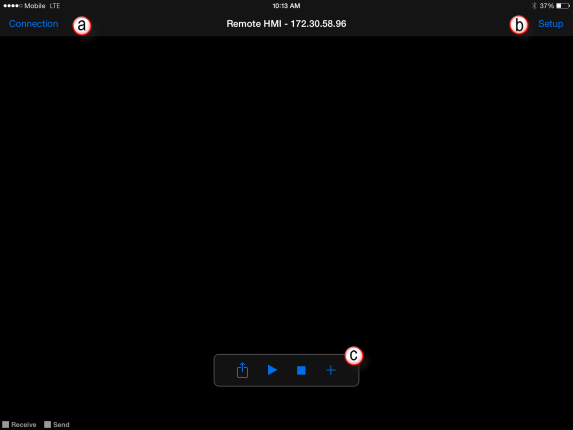
The image above shows the C-more Remote HMI App Workspace:
To access a remote C-more panel, click the Connection button. See Connection for complete details.
To configure the Client app and panel connection settings, touch the Setup button. See Setup for complete details.
The video style Connection Toolbar offers quick access to multiple tools. See Connection Toolbar for complete details.
|
|
Note: The Unlock Safety Button must be active (On) in order to interact with the remote C-more panel. |
Connection
The Connection button is used to select a method of connecting to the remote C-more panel.
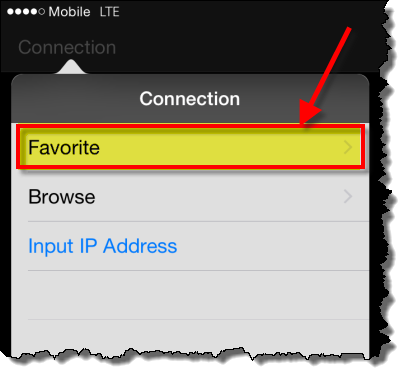
Favorite
Favorite makes it faster and simpler to remotely connect to a specific C-more panel by allowing users to save the settings required to connect. As an option, the logon settings can also be saved with each Favorite address to simplify the connections.
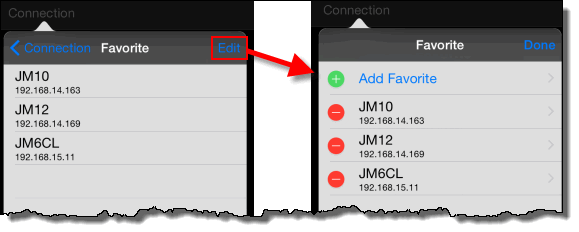
Add a Favorite
Favorites can be added by selecting the Edit button from the Favorite menu or a favorite can be saved by using the connection Toolbar that appears only when connected to a remote C-more panel.
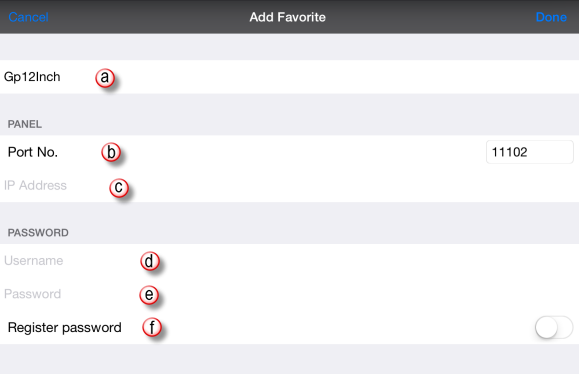
Configuring the Favorite Properties
If adding a favorite while connected to a C-more panel, the Name field will automatically insert the name that is stored in the panel project. The user has the option of keeping the same name or saving the favorite under a different name. Saving the favorite with a different name does not change the name stored in the panel, it simply creates a favorite list in the app with any name you choose. Saving the favorite name to match the panel name is considered the best practice.
The default port number for C-more panel Remote Access is 11102. The Port No. is the destination TCP port number used by the (Client) Remote HMI App and the listening TCP port of the C-more panel for this connection. This will be needed for access through a Firewall/Router if not using a VPN connection. The port number in the C-more Remote HMI App must match the port number of the Remote Access port of the C-more panel. If a VPN connection is not being used, then the Port Forwarding feature of your router must be used and the port number of the C-more panel must also be unique for each panel on the local network when those panels are accessed from outside of that network. Refer to the Router Setup for Internet Access section of the Help File for more information on port numbers.
The IP Address can be manually inserted or, if adding a favorite while remotely connected to a C-more panel, the field will automatically populate the IP Address of the panel.
Enter a valid user name. The user name is stored in the C-more panel project and is configured using the C-more programming software. If an account is activated in the C-more panel, but a user name and/or password are left blank in the configuration, then the panel will be accessible through that account by anyone.
|
Caution: If the C-more panel is controlling an application that could cause damage or serious injury to local operators or machinery being controlled by the panel, accounts should be limited to those authorized to view or control the remote application. |
The Password feature is recommended but not required. The account passwords are stored in the C-more panel project.
If this field is enabled, the user name and password will be stored with the favorite file. This will eliminate the need to type a user name and password when choosing a connection from the favorites list. Although this field simplifies the connection to the C-more panel, it also may allow unauthorized users access to a remote panel if the mobile device is used by an unauthorized user. It is recommended that this field be disabled (Off) if there are concerns for security and safety
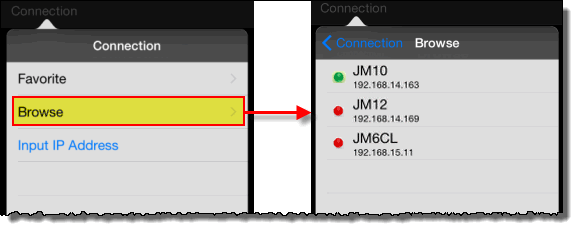
Browse
The Browse tool enables the C-more Remote HMI App to send an Ethernet multicast request over the local network to search for all C-more panels that are connected to the local network.
Browse List
Panel Name
The name stored in the panel memory or panel project. This name is configured in the project with the C-more Programming Software.
Panel IP Address
The IP address of the C-more panel. The IP address is stored in the panel memory or the panel project.
Color Indicators
Each C-more
panel listed on the network will have a colored indicator
to the left side of the panel name to show if the C-more panel supports
the C-more Remote HMI
App. When an incompatible C-more
panel is selected, an error Message will appear with an
explanation of the error. These indicators are used to
describe the following:
- Red: The C-more panel was found but the firmware in the panel is incompatible with the C-more Remote HMI App. If a C-more Series EA7 panel is targeted, the panel must be using firmware Version 2.73 or later.
- Yellow: The C-more panel was found, and the firmware is compatible, but the Remote Access Feature has not been enabled in the Panel. This feature is configured with the C-more Programming Software and saved to the project stored in the panel. See Setting up the Remote Access for more.
- Green: The C-more panel was found, the firmware is compatible and the Remote Access Feature in the panel is enabled.
The Browse feature does have some limitations:
Routers
Many routers do not support Multicast. If you are connected through a router and the browse multicast does not function, you will need to input the IP address of the C-more panel manually. Once connected, the panel can be saved to the Favorites list to eliminate the need to enter the IP address for the panel manually each time you want to connect.
Timing
If there are several C-more panels on the same network, it is possible that some panels are not shown in the list due to network response time or response collisions. The browse may have to be executed more than one time in order to populate the list of C-more panels on the network.
Cellular or VPN Connection
VPN (Virtual Private Network) and cellular connections do not support Ethernet multicast. You will need to input the IP address of the C-more panel manually. Once connected, the panel can be saved to the Favorites list to eliminate the need to enter the IP address for the panel manually each time you want to connect.
Setup
Your experience will be affected by network bandwidth and latency, as well as project screen complexity. The Setup Button contains the settings used to modify the performance of the C-more Remote HMI App connection. The Client settings are stored in the C-more Remote HMI App. on your device. The “Panel Settings” are stored in the C-more panel and if changed, the panel will maintain the values of the last settings entered. Selecting the Setup Button displays the Setup window.
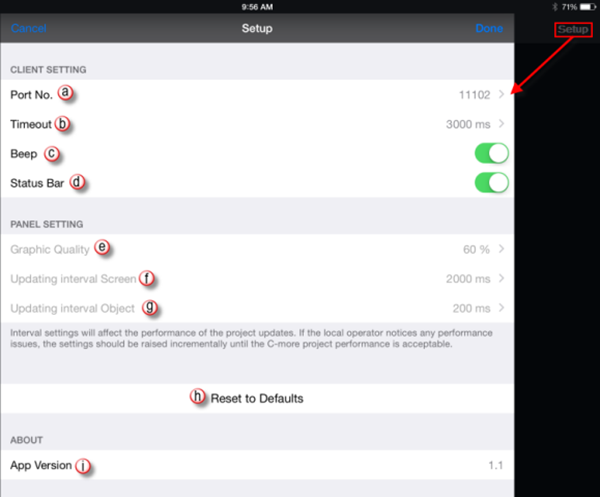
Client Setting
Client device settings do not affect performance or local operations at the C-more panel.
The default port number for C-more panel Remote Access is 11102. The Port No. is the destination TCP port number used by the (Client) Remote HMI App and the listening TCP port of the C-more panel for this connection. This will be needed for access through a Firewall/Router if not using a VPN connection. The port number in the C-more Remote HMI App must match the port number of the Remote Access port of the C-more panel. If a VPN connection is not being used, then the Port Forwarding feature of your router must be used and the port number of the C-more panel must also be unique for each panel on the local network when those panels are accessed from outside of that network. Refer to the Router Setup for Internet Access section of the Help File for more information on port numbers.
Affects the Client (Remote HMI App) side of the application in milliseconds. Increase the timeout value to reduce timeout errors on slow connections such as cellular connections with poor signal strength.
The Beep sound is heard when the C-more Remote HMI App user activates an input object on the C-more panel project. The remote user can choose to hear the Beep on the Client (Remote HMI App) or turn it off. This does not disable the Beep sound at the panel itself, only the remote Client. The Beep will sound if the C-more panel acknowledges that an input object has been pressed.
The Status Bar is located at the bottom of the C-more Remote HMI App workspace and is displayed by default. It can be enabled or disabled by the user as needed. Refer to Status Bar later in this topic.
Panel Setting
These settings affect the communications settings at the remote C-more panel (Server) side. Panel operational performance may be affected by the adjustment of the communication settings in some applications that are processor intensive (such as PLC communications, Data logging, and animation). Unlike the Client Settings, these settings are stored in the C-more panel and are retained across sessions. This means that if the panel settings are changed while a remote user is online, another user connecting from a different C-more Remote HMI App will connect with the same settings last entered to the panel. For this reason each user may need to make adjustments to the setup items based on their network connection speed and performance.
Graphic Quality reduces the resolution of the screen objects. This feature was added to accommodate users who may not need 100% graphic quality and are more interested in a faster update rate. If users prefer high quality graphics, then the setting can be placed at 100%. This setting will be determined by the network speed and/or amount of Data on any one screen. The default is 60%.
Updating Interval Screen determines the rate at which the screen change updates will occur. For faster update rates, this value should be lowered. This can affect the performance of the local operations as the C-more panel may also be processing other requests such as PLC communications, Data logging, and animation. Default is 2000 ms.
This setting determines the rate at which the Objects on the screen will update when its state changes. If there are many objects on the screen that are changing frequently, the user may increase the update time to reduce the amount of Data that must be transferred. If a real time update is preferred, then this setting can be lowered to update faster. This is based on the user preference and can be affected by network traffic. This will affect the performance of the local operations at the C-more panel. Default is 200 ms.
This will reset the client settings and the panel settings to the C-more Remote HMI App defaults.
This contains the version number of the C-more Remote HMI App in use.
Unlock Safety Button
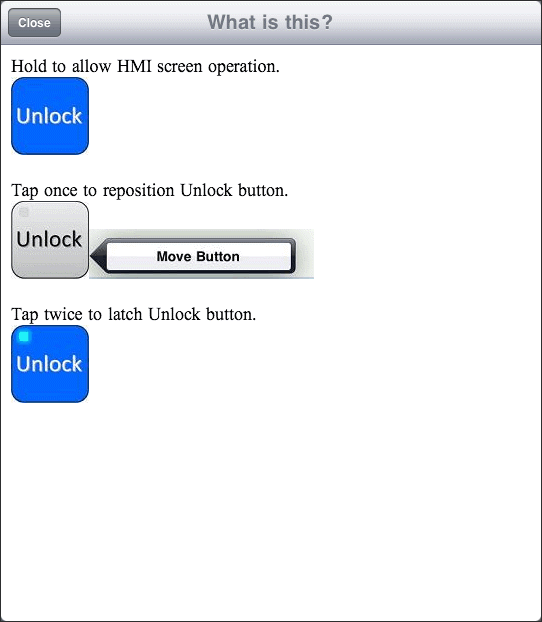
The Unlock Button feature has been added to help reduce unintentional activation of the remote C-more panel inputs, such as buttons and keypads entries. Mobile devices are susceptible to being dropped or the screen being touch by a user unintentionally. When in the "Off State", the C-more Remote HMI App workspace tools are active and allow the user to interact with the app menu items, zoom/pan actions, and control all touch interface features. The device functions as a mobile device in this state.
|
|
Note: The Unlock Safety Button must be active (On) in order to interact with the remote C-more panel. |
When the Unlock button is active, the C-more Remote HMI App controls all touch interfaces to the C-more panel. The device functions as a C-more panel in this state. The C-more Remote HMI App workspace GUI tools are not accessible when the Unlock button is active, and the app menu items and zoom/pan features of the mobile device are not accessible. To re-establish these features, the unlock button must be deactivated.
Unlock Button States
Off
(Default State) When the user first logs into the remote C-more panel, the Unlock buttons default mode is not active (off). In the "Off State", the mobile device acts in a local mode which activates the C-more Remote HMI App workspace tools and also allows the user to zoom and pan and control all local touch interface features.
Momentary
(Press and Hold) In the touch and hold mode, the Unlock button acts as a momentary button and is active only while being touched. This enables the user to interact with the C-more panel project interface.
Latched
Double tapping the button will latch it in the active(On) state and will remain in the active state until pressed again. This allows the user to interact with the remote C-more panel project as if operating the panel as a local operator.
Move
Tap the button one time to view the Move button. Tap the Move button to enable the Move feature. The Move feature allows the user to place the Unlock button anywhere on the screen as needed so that it does not interfere with the operation of the remote C-more panel inputs or block the view of objects on the remote screen.
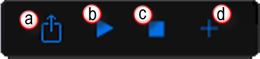
Connection Toolbar
|
|
Note: The mobile device also has a built-in feature that allows the user to capture the active screen image as a.jpg by pressing the mobile device Home button and the Sleep/Wake (On/Off) key at the top of the device simultaneously. |
The Connection Toolbar allows the C-more Remote HMI App to control the connection to the remote C-more panel. The Toolbar is designed much like the video control toolbar found in many popular video control softwares.
Allows the C-more Remote HMI App user to save a.jpg image to the photo section of the mobile device. This can be used to capture images of trends, alarm windows, or other screen items that may need to be reviewed at a later time. It is also a great tool for saving images to be used in documentation or the application.
The pause button will cause the C-more Remote HMI App to pause the updates from the remote C-more panel while still maintaining the connection to the panel. When pressed the button state will change and show the triangular Play button. When the play button is pressed, the remote C-more screen status will begin to update.
When the C-more Remote HMI App is connected to the remote panel, the Stop button will allow the user to disconnect the C-more Remote HMI App from the C-more panel without closing the C-more Remote HMI App workspace GUI. The app will display the last updated status of the remote C-more screen. Once disconnected, the stop button will be grayed out and the play button will then be activated. The user can press the Play button to reconnect the app to the remote C-more panel. The user login information will appear as it does when a new connection is made to the C-more panel.
The Add Favorite button allows the user to add and edit the active C-more panel connection to the list of favorites. This list allows simpler connection to the most used C-more panels.
|
|
Note: The mobile device also has a built-in feature that allows the user to capture the active screen image as a.jpg by pressing the mobile device Home button and the Sleep/Wake (On/Off) key at the top of the device simultaneously. |
Status Bar
The Status Bar is located at the bottom of the C-more Remote HMI App workspace and is displayed by default. It can be enabled or disabled by the user as needed from the settings screen. The status bar displays the following information:

The indicators blink when Data is communicated to and from the C-more Remote HMI App. As objects update on the remote C-more panel, the Receive indicator will highlight in green to show that an update was received by the panel. The Send indicator is activated when Data is sent from the Client (Remote HMI App) when an input object is pressed. This can be helpful when troubleshooting connection problems.
Located in the center of the status bar and displays the login permission level for the account that is presently active. There are three permission levels that can be used for each user account. View mode, View and Screen Control, and Full Control. These permission levels are stored in each C-more panel project and can only be changed by editing the project with the C-more programming software. See Setting up the Remote Access for additional information.
is value tracks the time that the C-more Remote HMI App has an active connection to the C-more panel being viewed. This value will increment when the app connection is running or paused with the control toolbar Pause button. It will reset when the connection is stopped with the control toolbar Stop button or the connection is lost.
Saving Favorites File using iTunes
Using iTunes 9.1 or later, you can copy files between your computer and apps on your iOS device that support file sharing. The C-more Remote HMI App creates a “.dat” file that stores the favorite C-more panel connection settings created by the user. This allows the user to copy, save, or move the favorites from one device to another, or create backup files for when a mobile device may fail or need to be reset. Refer to the iTunes help for more details on file sharing if needed.
Copying Files Using File Sharing
- Connect your mobile device Touch device to your computer.
- Launch iTunes 9.1 or later on your computer.
- Select your device from the Devices section of iTunes.
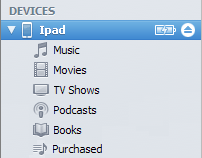
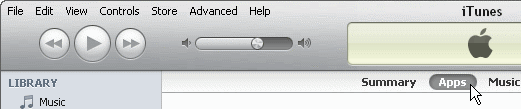
- Click on the Apps tab and scroll down to the bottom of the page.
|
|
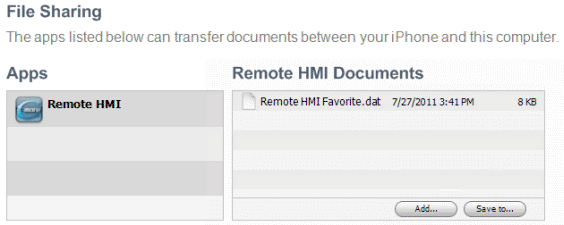
Note: If you do not see the File Sharing section shown in the image above, your mobile device does not have any apps that support File Sharing. |
- Under the File Sharing section, you'll find a list of apps currently installed on your mobile device that support File Sharing. Select an app to view a list of the files associated with that app on your device. “RemoteHMIFavorite.dat” should appear in the list when remote HMI is selected.
- Drag and drop files from
the Documents
list to a folder or window on your computer to copy them
to your computer
— or —
Select the file or files you want to copy to your computer from the Documents list and click the "Save to…" button.
