Animation Bitmap Object |
Topic: CM052 |
With Animation Bitmap you can display a Bitmap graphic on any screen and use the settings to animate the visibility, position, size, and rotation of the Object based on the values of Tag Names from the Tag Name Database. You can also switch from one bitmap to another by selecting the Multi-State Bitmap options.
Add an animation Bitmap Object to Your Project
To add an Animation Bitmap Object to your project:
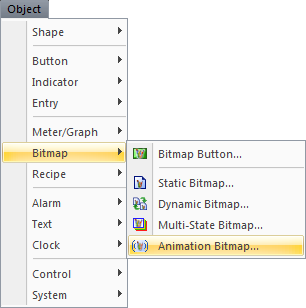
- From the Object menu, select Bitmap and then Animation Bitmap
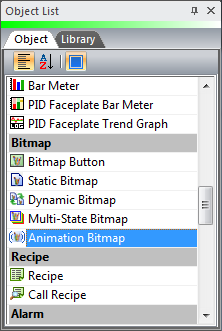
—or— - from the Object List, double-click on Animation Bitmap
—or—
click and drag the Animation Bitmap to the work area.
- The Animation Bitmap set-up window opens displaying the General tab.
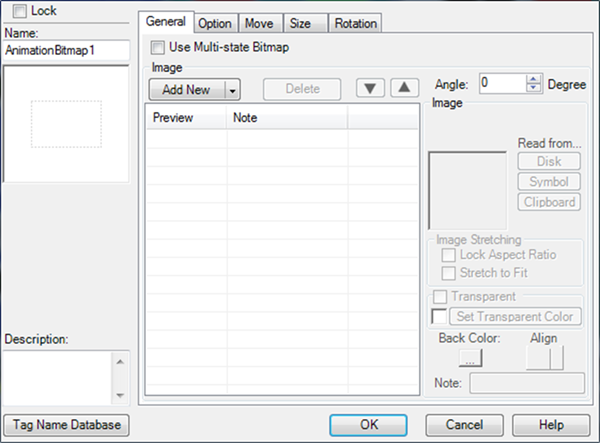
- Complete the fields on the screen that are common to all objects using the information in the Working with Objects Help topic.
- Fill in the fields below as instructed.
Lock: Tick this box to prevent accidental change to the object position or size.
Use Multi-state Bitmap: Use this option to change the bitmap to one of up to 16 bitmaps based on the value of a Tag. Use this to show an object in different states as it moves, rotates, or resizes.
A box on a conveyor in different states of open and closed or filled and empty.
When you select the Multi-state Bitmap option, the Tag Name field and Tag value Field appear. The Image also allows multiple image configuration.
Image
Add New: You may select images from the your PC drive, Symbol Factory® Graphic Library, or you may paste them from your Clipboard.
Click the arrow on the right side of the Add New button to select the location to retrieve bitmaps.
- Disk — (default) opens the File Explorer window to select the image from a drive on the computer
- Symbol — opens Symbol Factory to select from 4000 available images
- Clipboard — pastes an image you previously copied to the computer clipboard
Click Add New to and Open or OK depending on the source.
The image appears in both the Preview area as in the image below, and on the right side of the window.
- To add more than one image, select the Use Multi-state Bitmap check box and then click Add New.
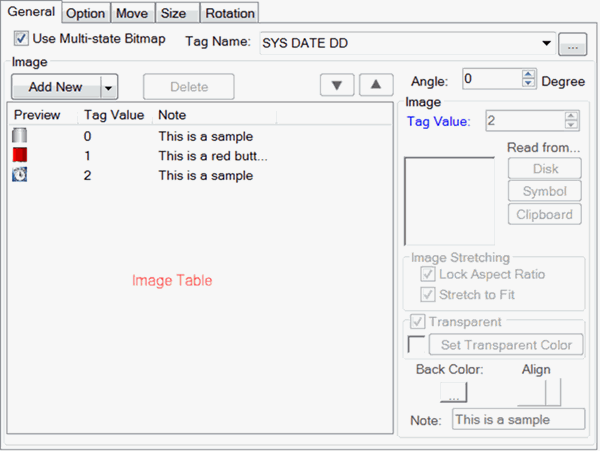
Delete: To delete an existing bitmap image from the image table, select the image row and click Delete.
Up/Down Arrows: These arrows are used to move images up and down the list when you select Use Multi-state Bitmap.
Angle: The base angle of the object on the screen. This is Zero degrees from the starting point for the Rotation animation.
Preview: Any time you change a setting, an object thumbnail preview displays.
Read From: Under Read From, click on the Disk, Symbol, or Clipboard to change the bitmap image used in the selected row similar to the Add New button drop-down.
Image Stretching: Use this convenience option only when necessary as it comes with a significant CPU resource cost.
When possible, use a graphics program to render the bitmap to the desired fit and save the bitmap file. Then use the revised bitmap file in the object in C-more.
Lock Aspect Ratio: Maintains the original height and width ratio of an image when it is resized.
Stretch to Fit: Stretch the image to fit the object frame.
Transparent: Transparency has a significant cost in terms of CPU resources and noticeably affects screen update rates. See Adding Transparency to animation Bitmap Images.
Set Transparent Color: See Adding Transparency to animation Bitmap Images.
Back Color: Image bitmap frame background color.
Align: Click to set justification of the text to left, center, or right.
Note: Click in the Note field to type a note about this image. The note text is displayed in the Image table next to the thumbnail image.
