Analog Meter Object |
Topic: CM051 |
Use Analog Meter Object to monitor an assigned Tag Name continuously. Use this Object to create digital versions of level, current, and flow meters or gauges that measure speed and other measurable data. There are many more possible applications.
|
|
Note: You can select the option to suppress scientific notation (exponential notation) when using Floating Point Data in the Panel Manager window. This is a global selection and applies to all Floating Point Data display objects. |
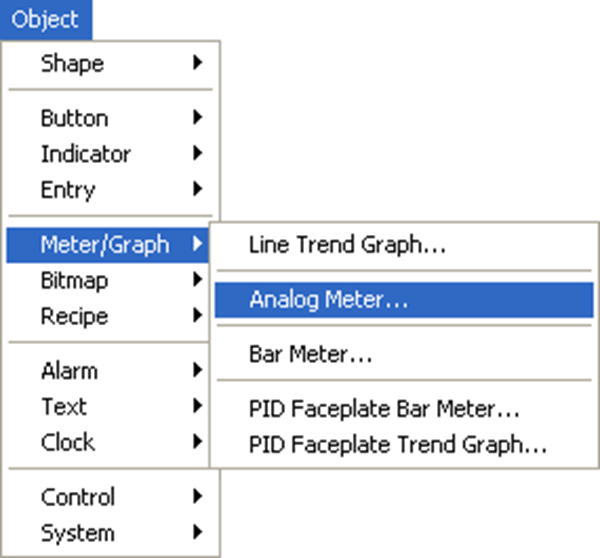
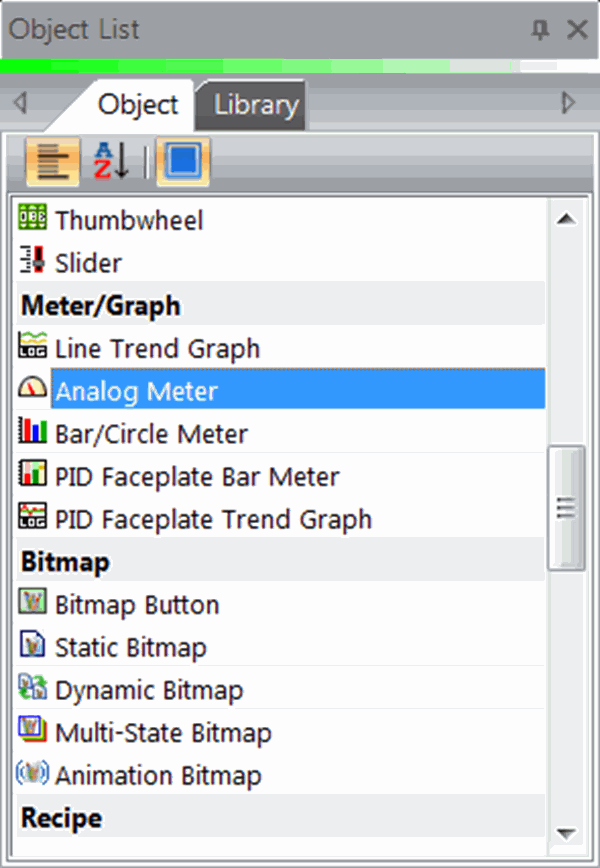
Add an Analog Meter Object to Your Project
To add an Analog Meter Object to your project:
- From the Object menu, select Meter/Graph and then Analog Meter
—or—
- from the Object List, under Meter/Graph Analog Meter click and drag the Analog Meter to the work area.
- Complete the fields on the screen common to all objects using the information in the Working with Objects Help topic.
- Complete the remaining fields on the screen using the information in the table below.
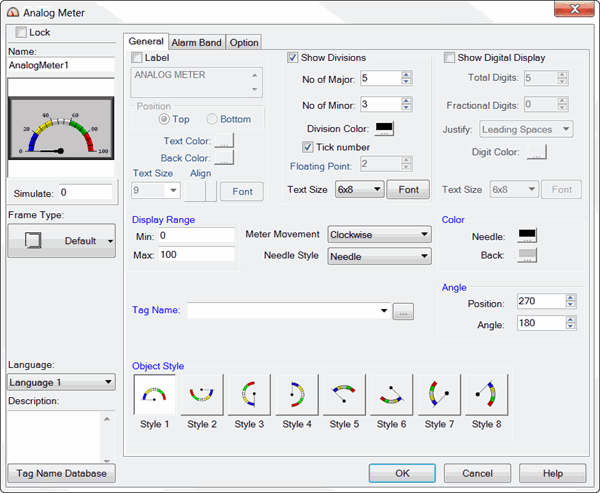
| Analog Meter Object | |
|---|---|
| Field |
Description |
| Lock | Select this check box to prevent accidental change to the object position or size. |
| Label | |
| Show Divisions | Select to show Tick Marks on the meter. |
| No of Major and Minor | Major divisions are where Tick numbers show up if turned on. Enter the number of sections into which you want divide the meter. Minor divisions divide the Major Divisions. Enter the number of sections into which you want divide the meter. |
| Division Color | Select the color for the major and minor tick marks and the Tick Numbers if they are turned on. |
| Tick number | Select to display Tick Numbers at each major division. |
| Floating Point | Enabled if you are use a Floating-Point Tag Name. Enter the number of decimal places to display in the Tick Numbers. |
| Show Digital Display | Tick this box to place a small window in the meter object with a digital display of the current value. |
| Total and Fractional Digits | Determines the number of digits to display: total and fractional digits. |
| Justify | Select how to display the number: Leading Zero – Places zeros at the beginning of a number smaller than the Total Digits entered above. For example, if the Total Digits is set to 5, the number 1.234 is displayed as 01.234. Leading Spaces – Places spaces at the beginning of a number smaller than the Total Digits entered above. For example, if the Total Digits is set to 5, the number 1.234 is displayed as 1.234. Trailing Spaces – Places spaces at the end a number smaller than the Total Digits entered above. For example, if the total digits is set to 5, the number 12.34 is displayed as 12.34. |
| Digit Color | Select the color for the digits in the Digital Display keeping in mind the background color for the digital display will be the same as the division that the needle is in. Make sure you pick a color that is visible in each division color. |
| Display Range | |
| Min/Max | Enter the range to display on the meter. Base it on the expected value from the PLC considering any scaling done in the Option Tab. |
| Meter Movement | Determines the direction of the meter needle from the Minimum to the Maximum. Click the drop-down arrow and select Clockwise or Counter Clockwise. |
| Needle Style | Select Needle or Thin Line. |
| Color | |
| Needle | Needle or thin line color. |
| Back | Meter background color. |
| Angle | |
| Position and Angle |
There are 8 styles with various preset angular positions and angular movements. To change the Position and Angle, enter different values in the Position and Angle parameters. You can set the Position from 0 – 360°. You can set the Angle from 1 – 360°. |
| Object Style | The Object Style option allows the user to select the preferred style to use for this Analog Meter object. Click on the preferred style to select it. Object Styles have preset angels and positions. For example, Style 1 is preset with an angle of 180° and a position of 270°. Style 5 is preset with an angle of 90° and a position of 315°. |
