Topic: P227

Define Tags

Description

The Define Tags window opens when a Tag that does not exist in the current Tag Database is entered in a Tag field of an instruction. When the Define Tags window opens, it automatically lists any Tags entered that do not exist in the Tag Database as shown below. This prompts the user to enter the required Tag information so each Tag can be properly added to the Tag Database.
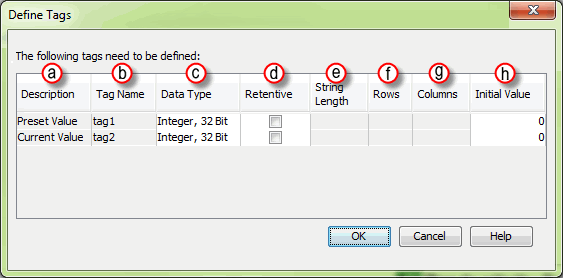
From the Define Tags window shown above, enter the proper information required to properly configure each Tag listed. The fields that require information and that can be edited will have a white colored background. The information required includes:

  1. Description: Displays the Name of the field where the Tag is being used.
  2. Tag Name: Displays the Tag Name as entered in the instruction field.
  3. Data Type: A default Data Type is displayed. To change the Data Type, click on the field and a drop down menu listing the Data Types available for the specific instruction will open. Select the desired Data Type from the list. Additional information on Data Types is available in the Data Types topic.
  4. Retentive: If power to the Productivity CPU fails, a Retentive Tag will retain it's value when power is restored to the CPU. To set the Tag as a Retentive Tag, click on the checkbox to select it. This setting is OFF by default, but it may be set to default ON in the Tools > Options > Tag DB settings dialog.

Note: If using Retentive Tags in your project, the amount allowed is dependent on the data type selected. See table below.

Data Type

Bytes Consumed

Boolean

1 byte

String

Length x 1 byte

All other data types

4 bytes

Maximum of 491,520 bytes allowed per CPU. Exception: Maximum of 102,400 bytes allowed for P3-550 CPUs that are Rev C3 or lower


  1. String Length: Active with String (Basic & Array) Data Type only. Enter the number of Characters in the Tag. Maximum is 128, Default is 15.
  2. Rows: Active with 2D Array Data Type only. Enter the number of Rows required in the Array.
  3. Columns: Active with 1D and 2D Data Type. Enter the number of Columns required in the Array.
  4. Initial Value:  Click on the field to overwrite the existing "0" value if needed. A "0" value sets the Initial status of the Tag as OFF. Type a "1" to set the Initial status of the Tag to ON.