|
|
Topic: P053 |
Data Logger |
|
|
|
Topic: P053 |
Data Logger |
|
Data Logger allows logging of system errors and up to 64 tag values on a USB storage device connected to the CPU. Logging can be triggered by the rising edge transition of a BooleanTag (Event) or can be configured to occur at regular intervals (Scheduled).
Data logging conceptually provides a historical record, rather than live access to data.
A USB storage device should be normally connected if logging data. The CPU maintains an internal 73KB buffer for temporarily logging data while no USB storage device is present. Data in the buffer will not be retained through a power cycle.
Recommended data logging rate should not exceed once per second, 2kB per second. Logging rate will be affected by CPU scan time and SD card behavior.
Note: P Series CPUs ONLY support up to a 32GB FAT formatted USB pen drive (P3 Series) or MicroSD card (P1 and P2 Series).
Note: P Series CPUs ONLY support a maximum of 200 files on a portable memory device, regardless of file size. Keep this in mind when scheduling new CSV file creation.
Note: To avoid data corruption, use the Remove Pen Drive Now function of the P2 CPU &P3-550(E) Front Panel LCD Display menu or use the Portable Memory Device Eject system tag when removing a USB device from a running P2 CPU or P3-550(E).
Note: With the P3-530 & P1 CPU, to avoid data corruption, use the system tag "Portable Memory Device Eject" when removing a USB device while the CPU is running.
There are three methods to access the Data Logger menu item.
Method 1
Select the Data Logger menu item from the Setup Menu of the Main Menu.
Method 2
Select Data Logger from the Monitor & Debug topics of the Application Tools panel.
Method 3
Select the Data Logger icon
located on the Monitor Toolbar. Once selected, a Data Logger window will open as shown below.
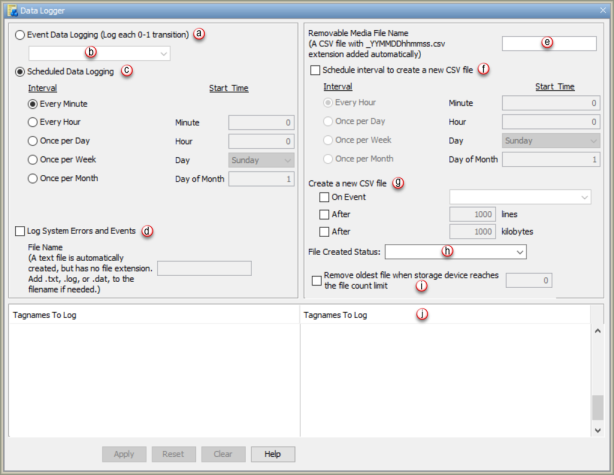
The Data Logger window provides the following:
Note: If event logging is selected and data log buffer reaches 512 bytes of data, then the buffer will write 512 bytes segments to the pen drive (unless pen drive is not present), in attempt to lower data log buffer below 512 bytes. However, how fast the buffer is filled is dependent on the frequency of event, the number of tags, and data types of these tags selected for logging.
- Every Minute: Tag Data will be logged once per minute.
- Every Hour: Tag Data will be logged once per hour at the designated minute (0 - 59).
- Once per Day: Tag Data will be logged once per day at the designated hour (0 - 23) and minute (0 - 59).
- Once per Month: Tag Data will be logged once per month at the designated day (1 - 31), hour (0 - 23) and minute (0 - 59).
- Every Hour: A new CSV file will be created once per hour at the designated minute (0 - 59).
- Once per Day: A new CSV file will be created once per day at the designated hour (0 - 23) and minute (0 - 59).
- Once per Month: A new CSV file will be created once per month at the designated day (1 - 31), hour (0 - 23) and minute (0 - 59).
Note: A new log file will be generated in the below cases. If a scheduled interval is chosen these cases are still applicable:
1) Stop -> Run (including power up)
2) New Config [New Project] sent to CPU (Run or Stop Mode transfers)
3) Pen drive eject
4) Set Date/Time
5) Scheduled file name change
The below features are only available with P1-622, P2-622 and newer (next-generation) CPUs.
Note: If no file name is given then a default of DL is added as a prefix of the logged file.
Note:.A boolean tag must be created in TagDB prior to being assigned to this field.
.Note: A boolean tag must be created in TagDB prior to being assigned to this field.
Below is an example using a discrete bit to trigger the Portable Memory Device Eject System Bit. Use an edge-triggered contact to SET the Portable Memory Device Eject bit. Once the SET goes high, the Portable Memory Device Ready bit will go low and the Portable Memory Device Eject bit will reset itself.
Note: RST instruction is not required.
Note: After Portable Memory Device Eject has occurred, remove and re-insert the memory device for it to become ready again.