Topic: CL116

| Com Port 3 Setup Details |
Topic: CL116
|
The Com Port Setup Details dialog displays current settings of the selected Port. Com Port 3 is used for General Communications, acting as a Master or Slave, using MODBUS (RTU) or ASCII protocol.
|
|
Note: The Com Port setup is stored in the Flash EEPROM in the CLICK CPUmodule. This means you MUST download the user project into theCLICK PLC after you make any changes in the Com Port Setup. |
|
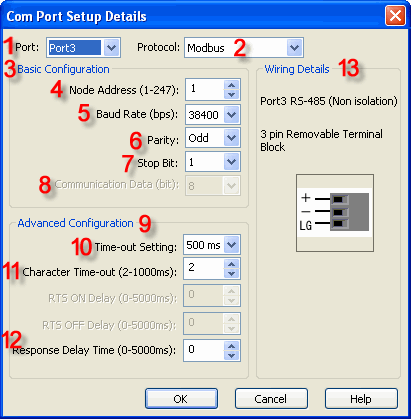
1 Port: Select Port 3 from the drop down list to populate this dialog with current Port 3 setups.
2 Protocol:Port 3 supports MODBUS or ASCII Protocol. Select the Protocol appropriate for your application from the drop down list. If this option is grayed out, it means one or more Receive/Send instructions are using this Com Port in the ladder program already. You can not change the protocol until you delete those instructions.
3 Basic Configuration: This field covers the Basic setup parameters that are necessary to use this Com Port.
4 Node Address (1-247) [MODBUS Only]: If you use this Com Port as MODBUS Master, please enter 1. If you use this Com Port as a MODBUS Slave, enter a MODBUS Node Address between 1 and 247. The Node Address needs to be unique in the network.
5 Baud Rate: Select a Baud Rate from the drop down list to match the Baud Rate setup of the network.
6 Parity: Select the Parity Bit setup from the Odd, Even and None to match the Parity setup of the network.
7 Stop Bit: Select the Bit Length of the Stop Bit between 1 and 2 to match the Stop Bit setup of the network.
8 Communication Data (bit) [ASCII only]: Select the Data Bit Length of the ASCII data between 7 and 8 to match the Data Bit Length setup of the external communication device.
9 Advanced Configuration: This field covers the Advanced setup parameters that are optional to use for Port 3.
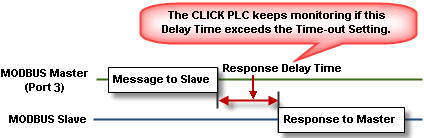
10 Time-out Setting [MODBUS Only]: This parameter defines the Maximum acceptable response delay time from the MODBUS Slaves after the MODBUS Master sent a request to the Slaves. Select a Time-out Setting time between 100ms and 30sec from the drop down list. If the response delay time from a MODBUS Slave exceeds this setup, a communication error occurs and System Control Bit SC103 (Port 3 Error Flag) turns ON.
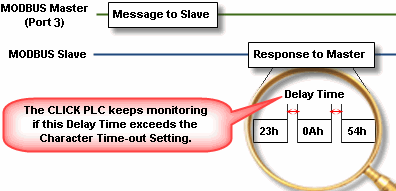
11 Character Time-out (2-1000ms) [MODBUS Only]: This parameter defines the Maximum acceptable delay time between each Character (byte data) in the response from the MODBUS Slave. Enter a Character Time-out value between 2ms and 1000ms. If the delay time between each Character exceeds this setup, a Communication Error occurs and System Control Bit SC103 (Port 3 Error Flag) turns ON.
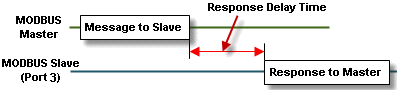
12 Response Delay Time (0-5000ms) [MODBUS Only]: When this Port 3 is used to communicate as a MODBUS Slave, you can adjust the Delay Time to response to the MODBUS Master. Enter a Response Delay Time between 0ms (No delay) and 5000ms.
13 Wiring Details: Port 3 follows the RS-485 Communication Standard. Port 3 pin assignments are shown on the dialog.