Topic: CL064

| Interrupt Setup |
Topic: CL064
|
The Interrupt Setup allows users to setup the condition to execute the Interrupt Program that is triggered by the Software or by an External source.
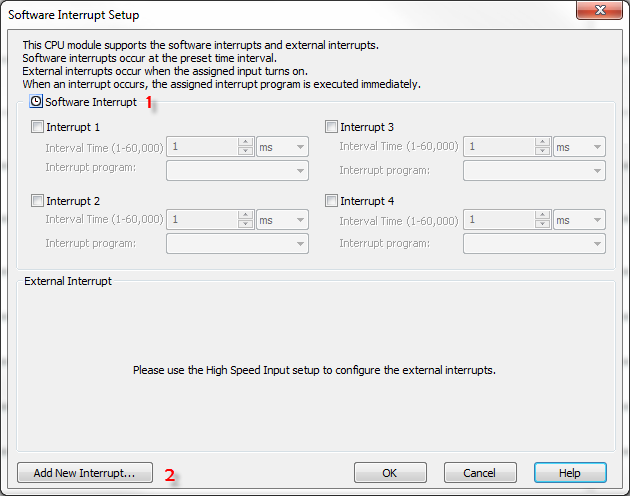
1Software Interrupt:
This portion of the window allows the setup of up to four
different Interrupt Programs
triggered by the Software.
Click on the Interrupt
checkbox to activate it. Enter an Interval
Time value and click on the down arrow to select if
the Time value is
in Seconds or Milliseconds. Then
click on the Interrupt Program
down arrow to select an Interrupt
Program to use. If none is available, go to Item #2
first to Add a New Interrupt Program.
Example:Interrupt
program "Interrupt01"
is set as Software Interrupt
at 10ms interval.
|
|
Warning: If you set a small number as the Software Interrupt interval, please be careful if the Execution Time of the Interrupt Program will not exceed the Interval. See the example below. |
|
Example:Interrupt program "Interrupt02" is set as Software Interrupt at 1ms interval, but it takes 2ms to execute the Interrupt program.
To avoid a situation like this one, please do not assign unnecessary short time periods as the software Interrupt interval. In addition, please make the Interrupt program simple if you want to set a short time period as the Software Interrupt.
2 Add New Interrupt: Click on this button to Add a New Interrupt Program to your project. When selected, the window shown below opens. From this window enter up to 24 characters for the name of the new Interrupt Program and click OK to accept it.
This creates the new Interrupt Program. Interrupt Programs can be found and accessed using the Program tab shown below. Double-click on the Interrupt Program to select and open it. For more information on Adding New Interrupt Programs, click on the green text. The Interrupt Icons indicate if the Interrupt is an External or a Software Interrupt.