Screen Selector Object — Screen Tab |
Topic: CM496 |
Configure the Screen Tab
The Screen Selector object is used to access a specified screen on the panel by selecting the screen number from a static keypad containing buttons to push or a single pop-up button.The Screen Selector window includes the Screen tab, which is used to configure what screens to list when the Screen Selector object is selected.
To configure the Screen tab, do the following:
- From the Screen Selector window, click the Screen tab.
The Screen tab opens.
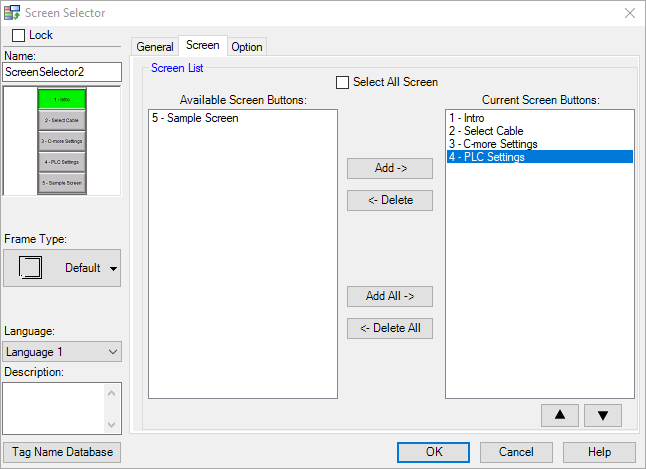
- Complete the fields on the screen using the information in the table below.
| Screen Selector Object — Screen Tab | |
|---|---|
| Field | Description |
| Select All Screen | When this box is ticked, ALL the screens available for the specific project are included in the Screen Selector list.To pick a specific screens instead of all the screens, click the box to clear.Select All Screen is the default. |
| Available Screen | This column is only active if the Select All Screen check box is clear.This column displays any available screen.If a screen is listed in this column, the screen is not included in the Screen Selector list on the object. |
| Current Screen | This column is only active if the Select All Screen check box is cleared.This column displays any screen that has been selected to display in the Screen Selector list.Only the screens included in this column will be listed on the object. |
| Add | This button is only active if the Select All Screen check box is cleared and there is at least one screen listed in the Available Screen column.This button allows you to add a screen from the Available Screen column to the Current Screen Column.To add a screen, click on the screen once to highlight the screen name, and click Add to move the screen to the Current Screen column. |
| Delete | This button is only active if the Select All Screen check box is cleared and there is at least one screen listed in the Current Screen column.This button allows you to delete a screen from the Available Screen column.To delete a screen, click the screen once to highlight the Screen Name and click Delete to move the screen to the Available Screen column.This does not delete the screen from the project. |
| Add All | This button is only active if the Select All Screen check box is cleared and there is at least one screen listed in the Available Screen column.This button allows you to Add All the screens from the Available Screen column to the Current Screen column with just one click.To add all screens, click Add All to move the screens to the Current Screen column. |
| Delete All | This button is only active if the Select All Screen check box is cleared and there is at least one screen listed in the Current Screen column.This button allows you to delete all the screens from the Current Screen column to the Available Screen column with just one click.To delete all screens, click Delete All to move all the screens to the Available Screen column.This does not delete the screen from the project. |
- Click OK.
- Continue to the Option tab in the Screen Selector window.
