|
|
Topic: P268 |
Compare Project |
|
|
|
Topic: P268 |
Compare Project |
|
The Productivity Suite Software Compare Project allows users to select P-Series project files (.adpro) and perform project-to-project comparisons on these files. In addition, the Compare Project Tool provides you with a graphical representation of your ladder logic and the ability to apply filters to perform a selective Compare. Once the Compare Project Tool has performed the comparison, it generates a report detailing the differences between the two project files. This report can be saved as an .adcmp file for future reference.
Click to jump to section:
There are two sections to Project Compare, TagDB and Task. This section covers the portion shared by the two different compares. TabDB and Task Compare are covered in more detail in the following sections.

- Save: Opens the Save dialog, from which a user can save the active compare report as an .adcmp file, with a name you specify.
- Open: Opens the Open dialog, from which a user can open a previously saved compare report.
- Close: Closes the active Compare Report and clears the Results window.
- Print: Opens the Print dialog, from which a user can Print the active report.
- Base Project: Users can compare a project on disk, the currently open project, or a historical version from the repository if version control is enabled. .
Note: To activate the browse button, close any open "on disk" project file by selecting File > Close Project.

![]()
UDI complare will show differences in Ladder between two projects that contain a UDI definition.
Note: For UDI compare differences please refer toTask View for details.
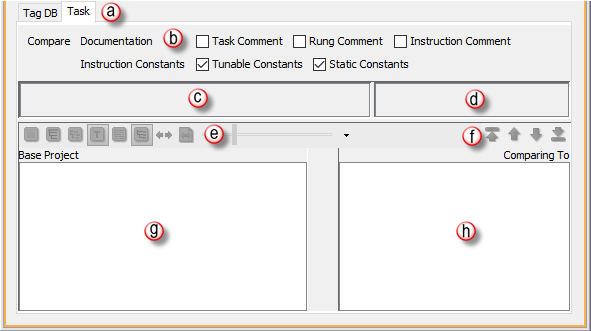
Header Options: The following section describes each of these header options:

- Task Comment: This is a single comment that is used to provide a general description for the entire task in question. The maximum number of characters in this field is 2048. This will only be seen in the specific task currently being edited.
- Rung Comment: This is a single comment for any given ladder rung in the program.
- Instruction Comment: This is designed to give the user specific details regarding this instance of this instruction.
- Tag Names: This is the descriptive name of each controller memory variable as defined by the user either in the Tag Database or in the instructions when programming.
- Tag Details: Shows the defined Comments and Wire Labels for each Tag Name in the Tag Database.
- Block Details: Allows the user to view or hide the details within the Function Block instructions.
- Zoom Controls: Provides users with more flexibility to format the display based on monitor size, display resolution and personal preference.
- Drop Down Arrow: Located to the right of the header icons, provides the Show Icon Descriptions option. When selected, the Show Icon Descriptions option will populate the header with icon descriptions as shown in the figure above.

Follow these steps to perform a project-to-project comparison of two project files:
Note:To enable the browse button, you must first close any open project file by choosing File > Close project.
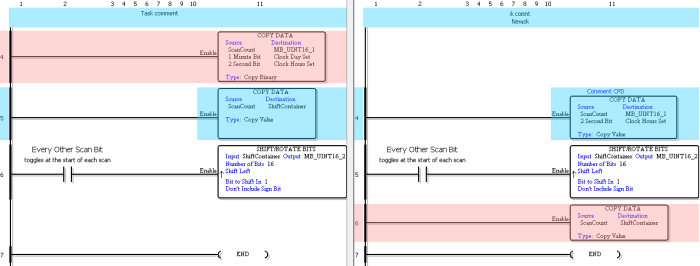
Results of relay ladder logic routines are displayed in graphical form. Differences between the Task, Base Project and Compare Project are color coded for easy identification. Once you run a comparison, the Productivity Suite Compare Tool generates and populates the Task, Base Project and Compare Project windows.
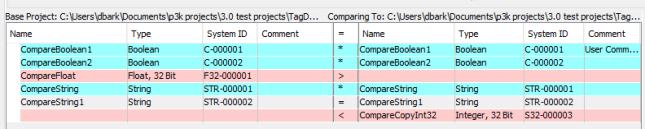
The Compare Report is a formatted file that displays the differences between the two projects selected for comparison. The beginning of the report consists of a task differences section, which will allow a user to select each task and view ladder differences. Throughout these sections, the differences between the two files you compared are shown side-by-side so that you can quickly see the variations between them.
Note:You can navigate between the various items within compare results, but you cannot edit its content.
Information displayed in the Task, Base Project, and Compare Project is color-coded:
For example, you might have a ladder routine that exists in both projects, but with a rung that doesn't match, or a tag that exists, but contains different data. Double-clicking on these items brings up more detailed compare information.
The Task View shows differences between task's in the comparison:
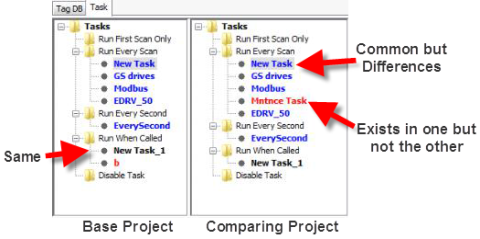
Ladder Logic routines are displayed in graphical form as shown below. Blue rungs indicate differences between the compared routines; red rungs identify items that are unique to that project. If the comparison detects a modified rung, the element(s) of the differing rungs may be further highlighted in blue. This typically occurs when the rung's structure is the same, but some elements are different.
Instruction Compare operations are performed by finding any differences between the same two instructions and displaying these in the Difference Detail block. This can be accessed by right clicking and selecting Show Difference Detail on any instruction block with an instruction that has a counterpart in the other task. The Difference Detail pop up will be displayed showing differences.
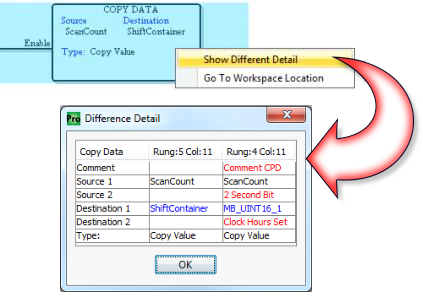
If you are using the Current Project in Workspace for the Base Project in the comparison, an option will be available by right clicking on an instruction and selecting Go To Workspace Location. This will take you to the Instruction Location in your currently open Ladder Project file.

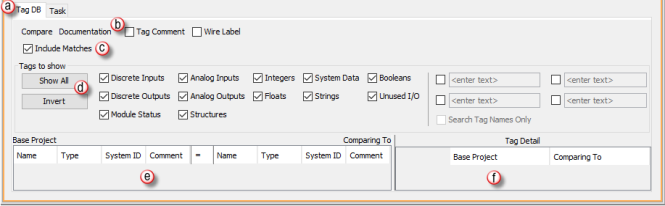
- TagDB tab: Overview of the TagDB Base and Compare projects of the Base project vs. Comparing To and Tag Detail panes.
- Compare Documentation: If selected includes the Tag Comment and Wire label differences in the compare.
- Include Matches: Selecting this option will include equal matches.
- Tags to Show: Use the check boxes across the top of the window to select which tags to display in the compare window. *Entering text in the Text Field will display tags with that text in the Name, System ID or Comment fields.
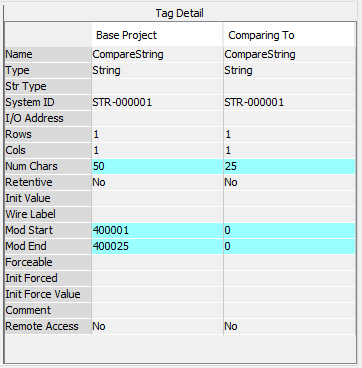
- Base project/Comparing To: Shows results of the TagDB compare.
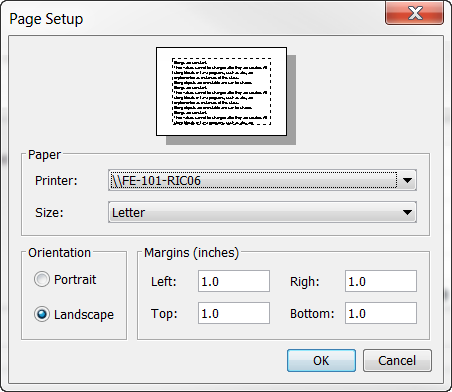
The Print function allows Printing of the results from the Project Comparison.
Note: Printing for Project Comparison can only be selected with the Project Comparison window. It can not be selected from the normal File > Print option.
Note: All rungs when printed will be rung wrapped.
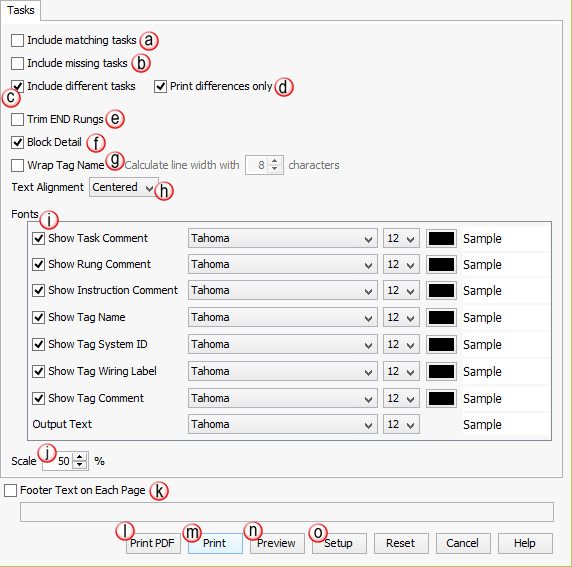
Note: This option will be grayed out if Include Different Tasks is not selected.
Trim END Rungs: Removes remaining END Rungs from the ladder printout.
Block Detail: Allows the user to view or hide the details within the Function Block Instructions. This option applies to all Block Instructions for the selected tasks.
Example:
Note: Adjusting the Font size up or down will affect the overall number of printed pages.
Note: All settings inside the Print window are now saved once you click the Print button. The Reset button returns all settings to their default value.