|
|
Topic: P245 |
High Speed Configuration Options |
|
|
|
Topic: P245 |
High Speed Configuration Options |
|
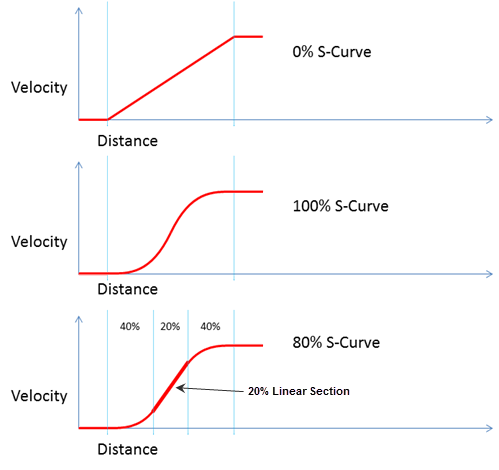
The % S-Curve field provides a method to smooth the transitions between velocity changes. This value designates the percentage of distance that will be smoothed during the velocity change. The valid range is from 0% (no smoothing) to 100% (no linear section). Adding or increasing the % S-Curve does not change the total time of the move, the time is still based on the linear acceleration parameters. Because of this, an S-Curve move will always have a steeper rate than the same Linear move.
The Use Jerk field provides a method to smooth the transitions between velocity changes of the SMOV and VMOV instructions. The value is in the form of Units/Second3. This value can be adjusted to limit the rate of change in acceleration in order to avoid problems with inertial loads.
Diagram #1 is an example showing very large instantaneous Acceleration and Deceleration changes at the beginning and end of a move. This would perform very poorly and cause a great deal of stress on the drive system.
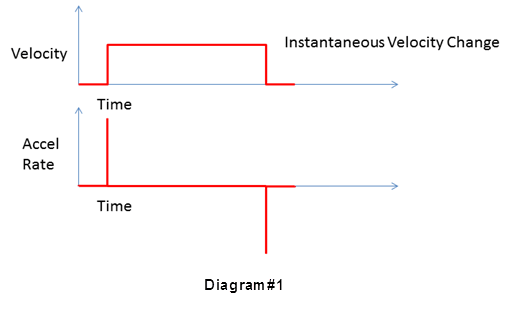
Diagram #2 shows a trapezoidal profile with linear Acceleration and Deceleration rates. This helps to reduce the "jerk" associated with the beginning and end of the move. The Velocity is controlled by the linear acceleration rate.
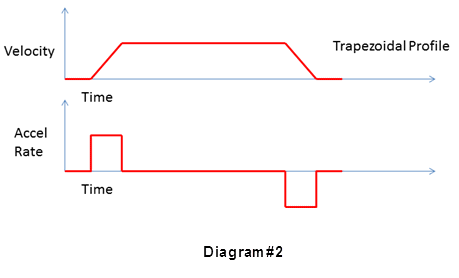
Diagram #3 shows a move using the Jerk option. The Jerk term changes the Acceleration and Deceleration rates over time. In turn, the Velocity is controlled by a sloped acceleration rate. The diagram shows the effect of the Jerk value on the Velocity curve which curves up slowly allowing for a smooth transition. As the Jerk value is lowered, the move will be smoother but will take longer to complete. As the Jerk value is increased, the move will become more like the trapezoidal profile shown above.
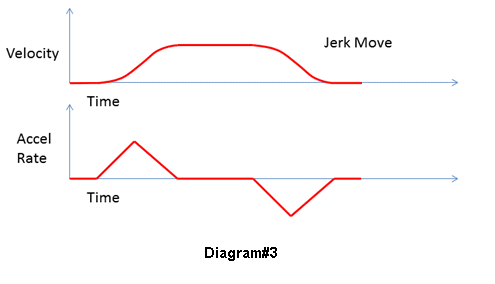
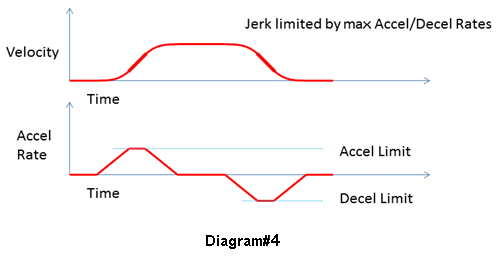
Diagram #4 shows what occurs when a move instruction's maximum Acceleration and Deceleration values limit the Jerk value. As the Jerk value increases the Acceleration rate over time, it eventually encounters the Acceleration Limit of the Move Instruction or Hardware Configuration. The Acceleration Rate then becomes linear for that section. The Use Jerk option will have very little effect if the value is set too high or if the maximum Acceleration and Deceleration rates are set too low.
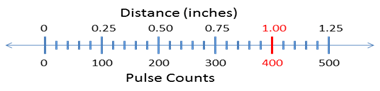
In the Channel Scaling options, the Position Unit's Standard or Custom setting allows the user to configure a channel for real world units. Instead of having to work in raw pulse counts, a unit value can be configured for convenience. This unit value will then be used throughout the P3000 system (H/W configuration, Feedback tags, and Instructions.) The following examples show how to derive the pulse count per position unit. This data could be empirically measured, or calculated by the system design. It’s easy to see in the graphic below that moving 1 inch will take 400 pulses. This value can also be calculated using any measured distance and known pulse count: 300 steps / 0.75” = 400 steps per inch.
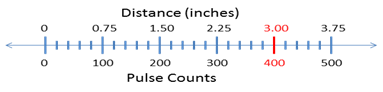
Fractional position units can be calculated the same way but we must consider the accuracy of the number system. In this example, the pulse count per position unit does not work out to a convenient whole number. 400 steps / 3.00” = 133.333... steps per inch. Since the fractional value cannot be accurately represented, this configuration would always have a position error. If this error is not acceptable then mechanical changes could be used to avoid this situation or the default setting (1 step per 1 unit) could be used with any necessary scaling done in the rung code.
Another consideration when configuring the Channel Scaling is the effect that outside factors, such as mechanical gearing ratios, may have on the resulting scaled value. For example, with a stepper motor, the steps per revolution rating of the motor and the step configuration of the drive also need to be considered. Stepper drives can be full-step, half-step, or microstepping. These configurations will affect how many pulses it takes per revolution of the motor shaft. A 200 step/rev motor connected to a half-step drive will require 400 steps per revolution.
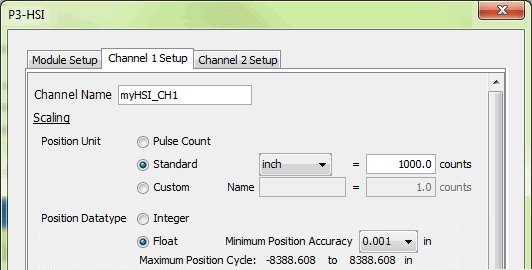
When using the Channel Scaling feature it is important to realize the implications of using a Floating Point tag datatype. The main implication is that the significant value has a precision of 24 bits which allows for accurate ranges of -8,388,608 to 8,388,608 units. The following examples show possible configurations of a system using 1000 counts/inch and show how tag datatypes affect the valid range.
Float tag data type, the valid range is -8,388.608 to 8,388.608 inches. Each significant unit represents 1/1000th inch.
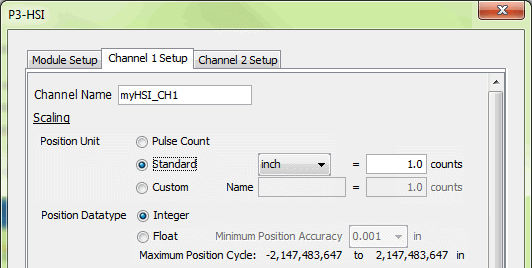
Integer 32-bit tag data type, the valid range is -2,147,483 to 2,147,483 inches. Only whole inches will be shown, even though fractional inch counts are maintained in the module they are not represented in the position tag.
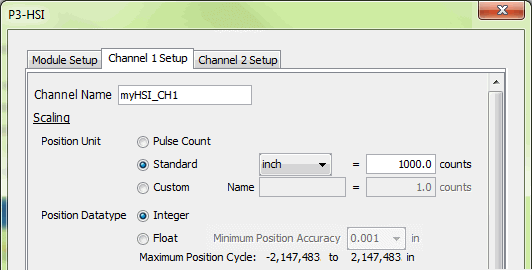
Integer 32-bit tag data type, the valid range is -2,147,483,647 to 2,147,483,647 in implied 1/1000th inch units (the example encoder is 1000 counts/inch). In other words, the 1’s digit is actually representing 0.001 inches, the 10’s digit represents 0.010 inches, and so forth. The valid range is -2,147,483.647 to 2,147,483.647 in actual inches. This allows for a larger range while maintaining accuracy, but it also burdens the programmer to always be aware of the implied decimal place.
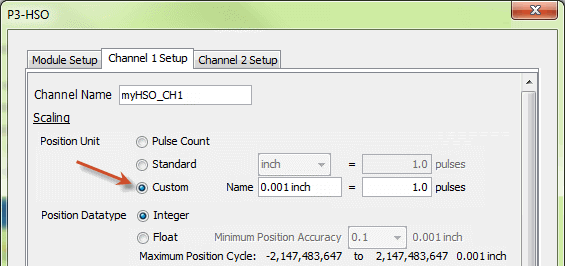
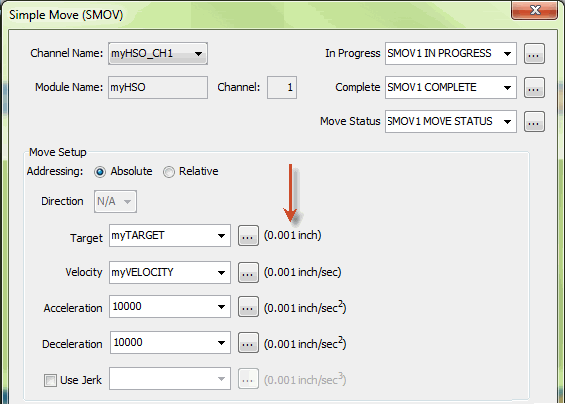
To relieve this burden you can choose to use a Custom Position Unit which allows the Unit Name to be any text. For Example 3 above we might change the name from “inch” to be “0.001 inch” which better describes the implied decimal units. The image below shows how this is configured in the HSO H/W Configuration, and how the instructions display the Custom Units to help the programmer.
Note: The HSO frequency output is based upon a master clock divided by a whole integer count. Exact frequencies are not available for the entire output range. As the desired frequency increases the steps between achievable frequencies also increases. This relationship between the desired frequency and the actual output frequency is shown by the following equation: Actual Frequency = 1Mhz / INTEGER (1Mhz / Desired Frequency)
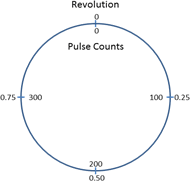
This option forces the channel position to stay within the range of Zero to the Rollover Position. This is sometimes called cyclic or ring counting. When incrementing, the position will rollover from the Rollover Position back to zero. When decrementing, the position will rollunder from zero up to the Rollover Position.
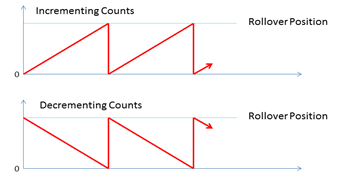
When this feature is enabled, the Use Shortest Path option will become available in the SMOV instruction configuration. This option allows the channel to make the decision on-the-fly which direction to travel to the target.