Size Tab |
Topic: CM396 |
The information included in this topic applies to the following Objects:
- Rectangle
- Circle
- Triangle
- Animation Bitmap
The Size tab allows the user to enter and edit settings that animate the size of the object according to the Tag Names and Parameters selected.
Object Size Tab Setup Window
The Size tab allows the user to enter and edit settings that will animate the length of the object according to the Tag Names and Parameters selected.
-
Click to select the Advanced check box on the top right corner.
-
Click the Size tab.
- When the Size tab is selected, the set-up window shown below opens.
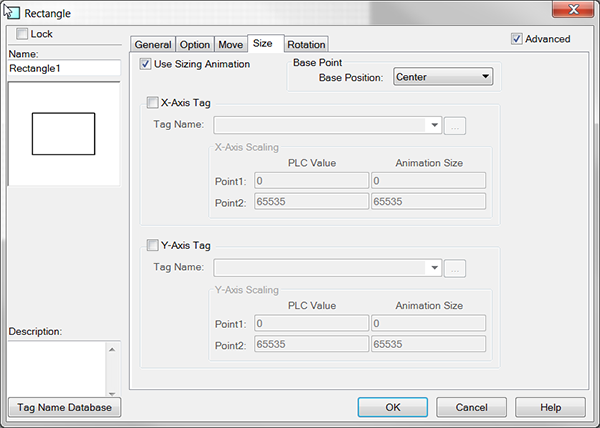
The contents shown in the figure above will be shaded, indicating that you cannot make changes to these fields.To make the window active,tick the Use Sizing animation box.
Set Up the Size Tab Options
Complete the fields on the screen using the information in the table below.
| Size Setup Options | |
|---|---|
| Field | Description |
| Base Point | Click on the down arrow to the right of the field to display a list of the options available.Select the Base Point, which is the point of the Object that will remain anchored. |
| X-Axis Tag | Click on the X-Axis check box to set up Horizontal Object animation.These settings will cause the object to expand or contract horizontally.If no animation is required for the X-Axis, leave the check box unchecked. |
| Tag Name | Click on the down arrow to assign a Tag Name that will activate the Horizontal Size animation settings.You may also click on the Browse button to open the Tag Name Database and add, edit, or delete Tag Names. |
| Size Scaling | The settings available with this item decide the Size Growth parameters according to values received from the PLC.The settings available are: PLC value: Click on the PLC value - Point 1 field and type in the desired low value from the values provided by the PLC.Click on the PLC value - Pinata field and type the desired high value from the values provided by the PLC. Animation Size: Click on the Animation Size - Point 1 field and type in the desired size of the object when the PLC value is at the Point 1 value.Click on the Animation Size - Pinata field and type in the desired size of the object when the PLC value is at the Pinata value. |
| Y-Axis Tag | Click on the Y-Axis check box to set up Vertical Object animation.These settings will cause the object to expand or contract vertically.If no animation is required for the Y-Axis, leave the check box unchecked. |
| Tag Name | Click on the down arrow to assign a Tag Name that will activate the Vertical Size animation settings.You may also click on the Browse button to open the Tag Name Database and add, edit, or delete Tag Names. |
| Size Scaling | The settings available with this item decide the Size Growth parameters according to values received from the PLC.The settings available are: PLC value: Click on the PLC value - Point 1 field and type in the desired Low value from the values provided by the PLC.Click on the PLC value - Pinata field and type the desired High value from the values provided by the PLC. Animation Size: Click on the Animation Size - Point 1 field and type in the desired size of the object when the PLC value is at the Point 1 value.Click on the Animation Size - Pinata field and type in the desired size of the object when the PLC value is at the Pinata value. |
Click OK.
