Rotation Tab |
Topic: CM373 |
The information included in this topic applies to the following Objects:
- Line
- Rectangle
- Circle
- Triangle
- Animation Bitmap
|
|
Note: To use the Rotation feature for the Line object, you must clear the box for Fix Horizontal or Vertical. |
The Rotation tab allows the user to enter and edit settings that animate the size of the object according to the Tag Names and Parameters selected.
Object Rotation Tab Setup Window
To view the Rotation tab for the objects listed above, click to select the Advanced check box on the top right corner must be checked and then click the Rotation tab.
When the Rotation tab is selected, the set-up window shown below opens.
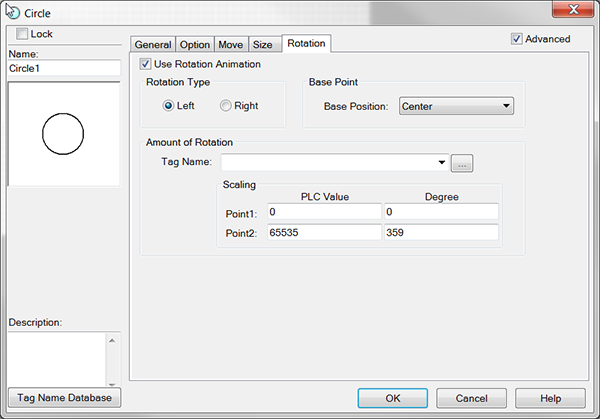
The contents shown in the figure above will be shaded, indicating that you cannot make changes. To make the window active, tick the box.
Set Up the Rotation Tab Options
Complete the fields on the screen using the information in the table below.
| Rotation Tab Options | |
|---|---|
| Field | Description |
| Use Rotation animation | Contents shown in the figure above are shaded indicating that you cannot make changes. To make the window active, tick the Use Rotation animation box. |
| Rotation Type | Determines if the rotation of the object will be to the left (counterclockwise) or right (clockwise). Click to set the desired direction. |
| Base Point | The Base Point, is the point of the Object that will remain anchored. It is the center of rotation. Top / Left Top / Right Bottom / Left Bottom / Right |
| Tag Name | Enter or select a Tag Name for the rotational position of the object. The Tag Name must be an integer. Without any scaling, the Tag Name value is assumed to be degrees. So 0 to 359 will result in a full rotation of the object. |
| Scaling | Scaling is the method used to match position you desire the object to be in for a particular PLC value. If a PLC value from 0 to 4095 should result in a full rotation of the object, then the settings would be: I PLC value Point 1 = 0 Point 2 = 4095 Degree Point 1 = 0 Point 2 = 359 |
