Object Move Tab |
Topic: CM271 |
The information included in this topic applies to the following objects:
- Animation Bitmap
- Circle
- Line
- Rectangle
- Triangle
Object Move Tab Setup Window
To view the Move tab for the objects listed above, do the following:
- Click to select the Advanced check box on the top right corner.
- Click on the Move tab to select it.The Move tab allows the user to enter and edit settings that will animate the object according to the Tag Names and Parameters selected.
- When the Move tab is selected, the set-up window shown below opens.
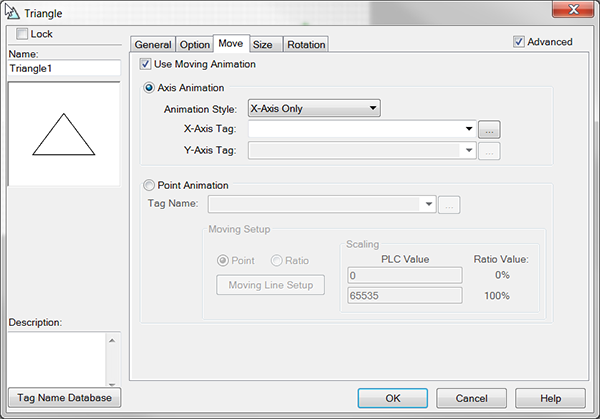
The contents shown in the figure above will be shaded, indicating that you cannot make changes. To make the window active, tick the box.
|
Note: The Axis animation and Point animation features cannot be selected at the same time.You must select one or the other. |
Set Up the Move Tab Axis animation
The figure above shows the Move tab set-up window with the Use Moving animation option selected.Complete the fields on the screen using the information below.
Axis animation
Click to set up the object to move on its own axis (see note above).The settings available are:
- Animation Style: Click on the down arrow to open the list.From this list select the axis to animate.
- X-Axis Tag: Becomes active only if the X-axis or the X- and Y-Axis selections from Item #1 are selected.Click on the down arrow to select a Tag Name to assign to the X-axis.You may also click on the Browse button to open the Tag Name Database and add, edit, or delete Tag Names.
- Y-Axis Tag: Becomes active only if Y-axis or X- and Y-axis from Item #1 is selected.Click on the down arrow to select a Tag Name to assign to the Y-axis.You may also click on the Browse button to open the Tag Name Database and add, edit, or delete Tag Names.
Point animation
Click to set up the object to move from points according to the configuration of the items listed below (see note above).
- Tag Name: Click on the down arrow to select a Tag Name to assign to activate the Point animation settings.You may also click on the Browse button to open the Tag Name Database and add, edit, or delete Tag Names.
- Moving Setup - Point: Select Point to configure Points that indicate where the object moves.To complete this setup, you must click on Moving Object Setup.Clicking this button opens the Moving Line Setup window that allows the user to add points by clicking on the desired spot on the window.The arrows on the top left corner allow users to select a point, add a point, delete a point.
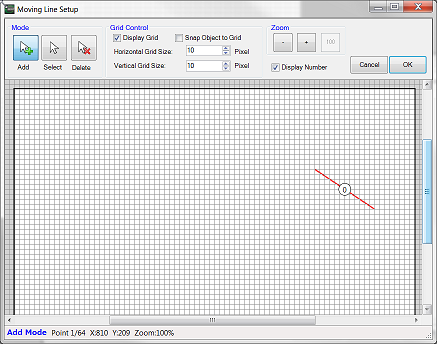
- Moving Setup - Ratio: Select Ratio to configure the ratio of the object movement.To complete this setup, click on Moving Object Setup.Clicking this button opens the Moving Line Setup window that allows the user to add Ratio Points by clicking on the desired spot on the window.
The arrows on the top left corner allow users to select a point, add a point, delete a point.The object will move across the indicated path according to the input received from a PLC and the value settings.For this to work properly, the PLC value discussed below must be set properly. - Scaling PLC value: These fields are only active if Point animation on Item #2 is selected and the Ratio is selected.Click on the top field to enter the value that represents a 0% on the PLC values.Click on the bottom field to enter the value that represents 100% on the PLC values.
Click OK.
