Ethernet Connection Setup — PC to C-more Panel |
Topic: CM132  |
This topic describes how to set up an Ethernet connection from a PC to a C-more panel, including how to browse to the network, select the correct network, and update IP Address settings.
- In the C-more software, under the Navigation pane, click the Panel tab.
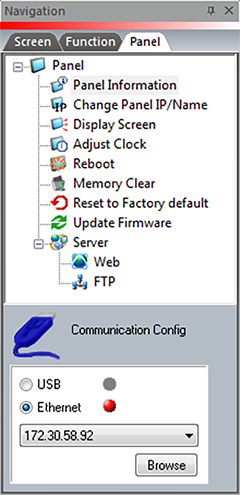
- Under Communication Config, click to select Ethernet.
- Click Browse.
- The Ethernet Connection Setup window opens displaying the Online Link List tab.
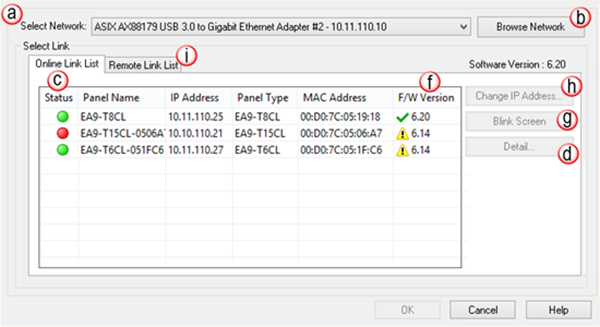
You can also access this tab in the Read From Panel window and Project Transfer window with the Browse button.
- The Online Link List tab displays a list the C-more Panels connected on the same network as the PC running the Programming Software.
- Although the Programming Software can browse to these panels to populate the Online Link List, the panel must be on the same Subnet as the PC for the Programming Software to Blink the Screen, Read a Project from the panel, or Send a Project to the panel.
- Click the Select Network drop-down arrow and select the Network Interface Card (NIC) in the PC.
- This is helpful to limit the browsing to a specific network when a PC has multiple network interfaces. For example, the local plant network and the enterprise information network.
- Click the Browse Network button to refresh the list with a Broadcast and Multicast simultaneously from the selected NIC to try to establish communication with C-more Panels connected to the network.
- Any C-more Panel on the network that can receive the Broadcast or Multicast and respond to the PC is displayed in the Online Link List.
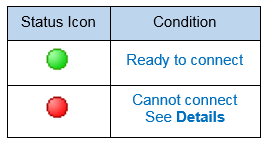
- In the Online Link List tab, if the Status icon is red, on the right side of the window click the Details button.
- The Connection Details window opens displaying the network details of the selected panel.
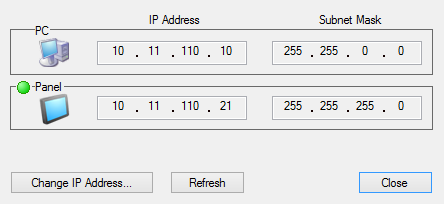
- In this window you can see the PC and Panel, IP Address and Subnet Mask.
- In most cases, in order to connect, the PC must be on the same logical network as the Panel.
- To edit the IP Address or correct a mismatch, click the Change IP Address button.
|
|
Note: Informative notes display when the Status icon is red. Sometimes notes display even though the status icon is green. This is not a problem. In some cases you can still make a connection even though the logical network addresses do not match. |
- Click OK.
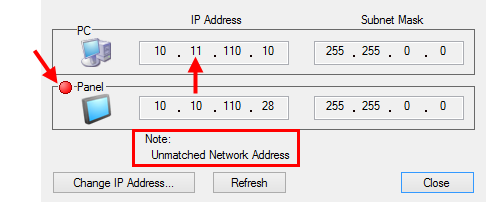
Unmatched Network Address
The Network Address is derived by AND-ing the IP Address with the Subnet Mask.
Problem Case:

On the Online Link List tab, the PC Network Address and the Panel Network Address do not match and will not connect.
No Problem Case:

In this example, the Network Addresses of the PC and the Panel do not match but the status indicator is green, and the PC and Panel connects because 10.11.0.110.0 is part of the same network as 10.11.0.0.
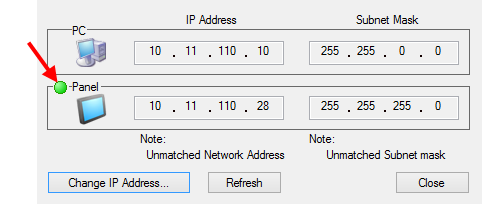
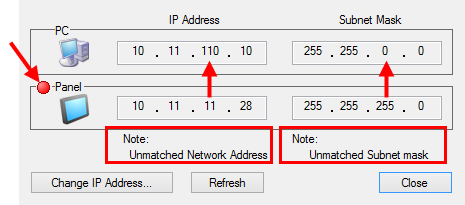
Unmatched Subnet Mask
The Subnet Mask for the PC and Panel do not match. This is not necessarily a problem, but unmatched Subnet Masks can cause an unmatched Network Address. The best practice is to have matching Subnet Masks to eliminate the potential for network communication issues.
In the configuration below, the unmatched Subnet Mask causes the Network Address to be unmatched, causing a connection issue. If the Subnet Mask for both were 255.255.0.0, then the Network Address for both would be 10.11.0.0, allowing a connection.
|
Note: See your Network Administrator for the proper settings for your network. |
F/W Version
If the Software and Firmware versions are not the same, then click Update Firmware to set the panel version to be the same as the software.
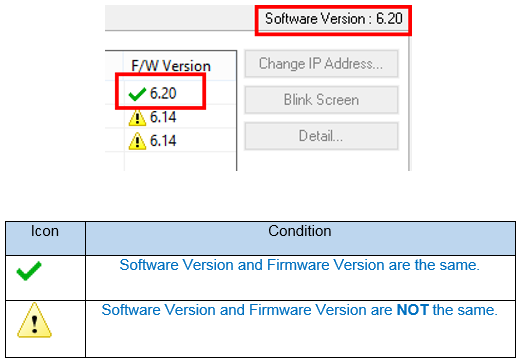
- In the F/W Version field, enter the firmware version number.
- When you select a panel in the browse list, the Blink Screen button provides a way for the you to confirm that you selected the correct panel by blinking the panel backlight several times.
- On the right, click the Blink Screen button several times to confirm the correct panel is selected.
- To edit the Panel Name or IP Address, click Change IP Address.
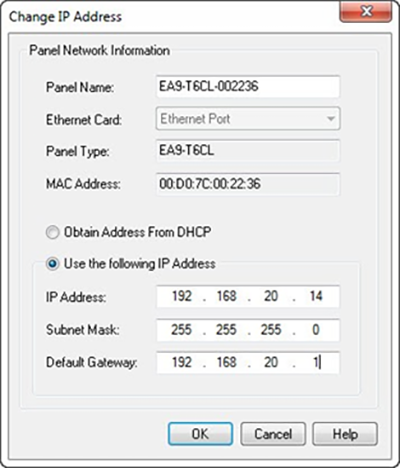
- The Change IP Address dialog box opens.
Network Settings
When you update network settings in the Change IP Address window shown above, follow these guidelines.
Obtain Address from DHCP Service
Allows the panel to query the network for a DHCP server that then assigns an IP Address to the panel automatically if a DHCP server exists on the network. If there is no response from a DHCP server, the panel follows APIPA standards and assume an IP Address that starts with 169.254.xxx.xxx.
The APIPA assigned address is not recommended because it may change without notice.
This setting is convenient when you set up a panel on an established network for programming and configuration purposes.
This setting is not recommended for control networks because the IP Address assigned by the DHCP server may be changed by the server without warning, causing potential communication issues.
Use the following IP Address
Allows you to manually set the IP Address, Subnet Mask, and Default Gateway.
Recommended for control networks so that the IP Address will not change.
- IP Address: The IP Address is unique for each device on the Local Area Network (LAN). If the IP Address is duplicated anywhere on the network, the panel will not communicate properly. See your network administrator for an available IP Address.
- Subnet Mask: Unlike the IP Address, the Subnet Mask should be the same for each device on the Local Area Network (LAN) that will be communicating with each other. See your network administrator for the proper Subnet Mask.
- Default Gateway: If a router is used to connect the LAN to another network and the C-more communicates with devices on the other network, then this is the IP Address of the router. See your network administrator for the proper Default Gateway address.
Connect to Remote C-more Panels
The Remote Link List tab connects you to panels not on the same network as the PC; for example, a panel that resides on the Internet or a Virtual Private Network (VPN).
The Online Link List uses Broadcast and Multicast, which are blocked by routers by default. Remote Link uses a Unicast; that is, it uses the IP Address you enter for a specific panel to connect to that panel, which is not blocked by routers by default.
To connect to a remote panel, in the Ethernet Connection Setup window click the Remote Link List tab.
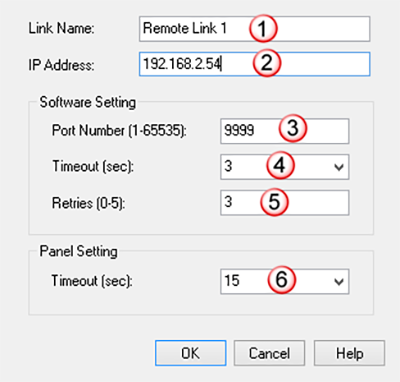
When completing the settings in this window, follow these guidelines.
| Remote Link List | |
|---|---|
| Field |
Description |
| Link Name | Enter any desired name for this link. It is only for display purposes in the Remote Link List. |
| IP Address | Enter the known IP Address of the panel you wish to connect. |
| Port Number | Enter the TCP Port number of the panel or the remote network router you wish to target. The C-more Panel programming port number is 9999. The only reason this number would change is for use with Port Forwarding in a Router. |
| Timeout | Enter how long the software should wait for a connection response. Increasing this value may help stay connected on a noisy or slow connection. |
| Retries | Enter how many times the software should try to connect before an errordisplay. Increasing this value may help stay connected on a noisy or slow connection. |
| Panel Setting Timeout | Enter the period of time the panel will wait if the connection from the PC is interrupted. Increasing this value may help stay connected on a noisy or slow connection. Keep in mind that the higher the value, the longer it takes for the panel to be available for another connection after the previous connection is lost. |
